Each physical person who is going to use ACE must have a unique user account in the system with the required access right. Account data for all ACE users are administrated in ACE Admin, under the User | User accounts menu choice.
In addition to information about identity and access rights, this is where details for the handling of personal calls, alternative answering points, and codes for mobile login are also specified.
To use the User accounts... menu choice, you need a an access role where Own user or Modify user is included. You also need at least one organisation area or subarea among you access areas. In the System administrator role, access to all organisation areas is included.
An overview of the top of User accounts window
In the upper part of the User accounts window, you add data on the relevant row and save with OK.

Organisation area: Select one of the areas included in your access areas.
Subarea: choose if you want to see users serving a specific subarea, users [Without subarea], or [All] users regardless subarea .
Access role: choose to see users with a specific role or [All], if you have the access right to see all roles.
Context menu with the functions offered in many different tables:
- Make changes in the selected field
- Export the list to file
- Advanced search function. See Search and filter in tables.
- See grid lines for clearer delimitations between rows and columns.
Facts about the marked user can, in most of the columns, be changed directly in the table.
- + adds a new row where you can create a new user account.
-
 duplicates selected user account, i.e. adds a row with some values filled in.
 - - selected user account.
Some changes will be enabled at next log in, i.e. not during ongoing session. See When do the changes take effect?
In the Copy profile window you copy selected user's attribute(s) to multiple user accounts. See Copy profile to multiple users.
Buttons for the importand export functions as described in Import to ACE Admin, Export user account information to file and Search and filter in tables.
At the bottom of User accounts window
In the bottom part of the User accounts window, you see and change the following
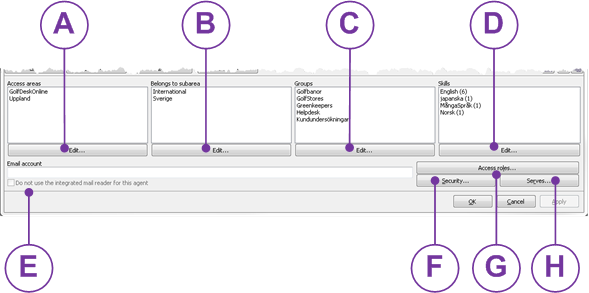
Access areas that the user shall be able to supervise and configure.
Subareas ruling
- who can see and administrate the user’s various tasks,
- how the user is seen in e.g. statistical reports and current status views.
Group affiliation.
Skills, ruling which queues he can service.
The user’s email address. A tick means emails are handled in a separate email application.
Security. Functions for password handling.
Which functions that are included in an access role.
Which queues the selected user serves.