In the Queues and waiting lists window, found under Routing | Queues and waiting lists... menu choice, you can create, remove, modify and view the skill based queues. You can also create a so-called collaborating queue, meaning that you connect an incoming IVR queue to a callback queue.
Select area
Your selection of Organisation area and Subarea at the top of the window controls which queues and waiting lists that are displayed in the table beneath. When creating a new queue/waiting list, this is done in the organisation area that was selected in the Organisation area box. The new queue/waiting list is affiliated to the subarea that was chosen in the Subarea drop-down list, but this affiliation can be changed. In Subarea you can not only select specific subareas but also the All and Without subarea options.
Service and queue name
Each row in the table relates to a queue or waiting list. The name of the queue/waiting list can be seen in the second column from the left. The Queue/waiting list column contains the name of the queue/waiting list , specified in a text box. A queue name can be composed by both letters and figures.
The eight basic services that can have queues connected to them are:
-
 Incoming calls, queue
 -
 Incoming calls, waiting lists
 -
 Callback, queue
 -
 Callback, waiting lists
 -
 Incoming email, queue
 -
 Incoming email, waiting lists
 -
 Incoming chat, queue
 -
 Incoming chat, waiting list
How the agent see the services in ACEAgent is described in Basics about Queue status window
The two services for campaign of the preview type have queues and waiting lists connected to them as well but this is done in another way, in a separate window, when creating a campaign. In the same Campaign window you also configure campaigns of the dialer type.
-
 Campaign, preview queue
 -
 Campaign, preview waiting list
 -
 Campaign, dialer
See Create a new campaign. How the agent see the services in ACE Agent is described in Basics about campaign.
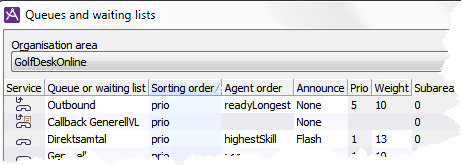
Set sorting order
All contacts in a queue are always sorted in order for ACE to know the routing order for contacts to an agent. There are various ways to sort the contacts, suited for different types of contacts and situations. The most common order is that the calls or emails that have been the longest time in queue are routed first, but it is also possible to sort by e.g. the priority of the calls.
In the Queues and Waiting lists window, the Sorting order column you specify the contact sorting order in a queue/waiting list. You have five options to choose between.
- prio
- Sorting primarily by priority and then by queue time.
- routeReqTime
- Sorting by queue time, i.e. time when the contact starts queuing.
- dateTimeStart
- Sorting by start time for ring out, i.e. time when the contact will be called.
- dateTimeStop
- Sorting by stop time for ring out, i.e. the latest time for the contact to be called.
- none
- No sorting.
Agent order column
If several agents are ready and satisfy the skills requirements to serve a queue, ACE chooses one of these agents. Configuration in the Agent order column controls the principle for this choice.
The following can be selected in this drop-down list:
- readyLongest
- The agent who has been ready the longest receives the contact.
- highestSkill
- The agent with the highest skill level receives the contact. If the queue requires several skills, the agents’ skill levels are summed up for these skills before comparison. If there are more agents with exactly the same skill level, the contact is routed to the agent having been ready the longest time.
- lowestSkill
- The agent with the lowest skill level receives the contact.
- none
- No specific strategy behind who receives the contact.
Announce column
Selection in the Announce column header specifies whether agents serving this queue/waiting list shall be notified when a contact arrives, and the contact cannot be delivered immediately. To handle a so-called VIP, an incoming contact that is to be treated with extra high priority in the system. The choices are:
- None
- No announcement is made.
- Flash
- Announcement is made in the agent’s queue status window, where the queue/waiting list is seen marked with a flashing colour signal. There can also be a sound signal.
- Dialogue
- Announcement is made by the opening a dialogue window which the agent has to click to close. Used for queues where you treat incoming contacts with extra high priority in the system. Any of those agents can then choose to temporarily park his contact in progress or in other way become Ready in favour of the VIP contact.
Announcement can only be made for queues with priority 1. If a non-announced queue is changed into an announced queue, the priority is automatically set to 1, regardless of the queue’s earlier priority.
Prio and Weight columns
The Prio column heading is an abbreviation for priority and in this case relates to the current queue’s/waiting list’s priority in relation to other queues/waiting lists. Priority is a number between 1 and 9 and is specified in a text field. A ready agent, who satisfies the requirements for serving more than one queue is allocated a contact from the queue that has the highest priority (lowest figure). If two queues have the same priority, the queue time determines which contact is delivered to the agent.
The Weight column title is a complement to Prio (see above). Weight factor is used to prioritize calls from different queues, but unlike the priority term, the time a call has been waiting in a queue is also taken into consideration. Weight factor is only used for comparison between contacts in queues with the same priority. The weight factor for calculating the queue time for a call is adjusted from the weight factor. The time is divided by the weight factor.
Call 1 has queued for 30 seconds in queue A, having weight factor 1.
Call 2 has queued for 40 seconds in queue B, having weight factor 2.
The adjusted queue time for call 1 is 30 seconds (30/1) and for call 2 it is 20 seconds (40/2).
Call 1 will thus be serviced before call 2 as this call has been waiting longer in queue according to the adjusted queue time.
Both queues must have the same priority value to attain the desired action.
Specific rules apply for so-called collaborating queues.
Subareas column
The Subareas column shows the number of subareas each queue/waiting list belongs to. If a queue/waiting list belongs to more than one subarea you see an alert triangle  in the title and on the row in question. The purpose is to make the administrator aware of the consequences this can have for e.g. statistical calculation. To see the names of the subareas you click the Subareas... button.
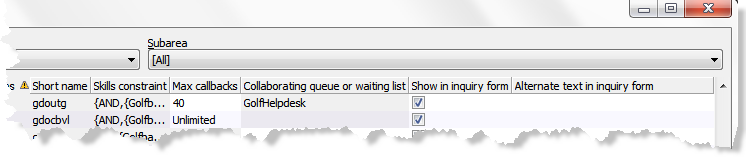
The Short name column
The Short name column just shows the database name of each queue/waiting list.
Also see Delete queue or waiting list.
The Skills constraint column
The Skills constraint column specifies the skills and group affiliation requirements that are set for an agent to be able to serve the queue/waiting list.
In the Skills constraints window, opened with the Skills constraint... button, the same information is presented in a simpler way. Here you can modify the Group membership required for delivery and Skills required for delivery as seen inAdd new skill based queue or waiting listBasics about skill based routingAlso see Basics about skill based routing.
Max callback calls
You can limit the number of callback records in a number of ways, to avoid more records being set up than the contact center has the time to call.
- Per organisation area
In the Routing of contacts window, the Callback tab, you can specify Max number queuing call records for a given organisation area. - Per queue/waiting list
In the Queues and waiting lists window, the Max callback calls column, you can per a given queue select the Unlimited option or a limitation in figures.
If calls are placed in an IVR queue with a collaborating callback queue the check is made both for the organisation area and the collaborating callback queue. If the call has been escalated to an IVR queue without a collaborating callback queue no check is made.
The maximum values described above do not stop new records being entirely but is merely used as a control mechanism to make the IVR delay in offering callback, until the contact centre catches up.
As several people can be offered callback in the IVR at the same time, the limit values may be exceeded. Everything in order to not refuse a customer to create a callback after the customer having been offered callback. Where only a few agents handle callback a more strict control can be necessary. To set a sharp maximum limit there is a system parameter that collaborates with the value you have specified per queue in the Queues and waiting lists window. The system parameter influencing the maximum limit for callback, callbackMaxQueuedHardLimit, is found in the System parameters Callback/Campaign tab.
Collaborating queue or waiting list
Using the collaborating queues function callback can be offered by queue position. The customer calls in and gets a position in an IVR queue. If the number of queuing calls reaches a given limit the customer is offered callback. Instead of sitting and waiting for his turn the customer will be called when the time has come to connect him to an agent. The customer automatically counts the queue time from the IVR queue call when it is routed to the corresponding collaborating callback queue and a collaborating queue position can be entered in IVR messages. The implementation in the IVR decides which value to present.
A collaborating queue means that a skill based IVR queue can be linked to a callback. The queues must have the same sorting order for the co-operation to function. If you will be using collaborating queues you should activate the usePriorityContactSelection, Primarily use contact priority when selecting contact to agent system parameter.
You can see that a callback queue is collaborating with an IVR queue in the Collaborating queue or waiting list column to the right in the Queues and waiting lists window. Connections between collaborating queues are shown with curve lines as well. Via the Show collaborations checkbox at the bottom of the window, you choose whether you want to see those curves or not.
The following applies when an IVR queue is to be linked to an existing callback queue:
- You cannot link queues with different distribution types. An IVR queue cannot be linked to a callback waiting list, for example.
- An IVR queue can only be linked to just one callback queue.
- If you, in the drop-down list opened by a double click on the row, or by selecting Modify in the context ruled right click menu, do not find a suitable callback queue to link the IVR queue to you select Create new How to proceed from there is described in section The Add queue or waiting list window. The new collaborating callback queue, seen in green until saved to the database, inherits some of the settings from the IVR queue.
- When you have selected a callback queue ACE will adjust the priority (Prio) and weight factors (Weight) to make the values correspond with the values for the IVR queue. This is necessary to be able to present a collaborating queue position. Other attributes for the callback queue will not be influenced.
- If you change the weight factor and priority for the IVR queue or the callback queue ACE makes the corresponding changes in the collaborating queue.
Should you want to remove the link specifying that an IVR queue collaborates with a callback queue, you select the empty row in the drop-down list. When the link is removed the queues are seen as separate and no longer have any connection to each other. If you want to remove a queue that is linked to collaborating with another queue you must first remove the link.Displaying queues in the enquiry window
To the right in the Queues and waiting lists window, you can configure what you want the agents to see when making an enquiry or placing a contact in queue in ACE Agent or ACE Interact.
Under the Available for call and place in queue header, you tick the checkboxes for the queues, and waiting lists that the agent shall be able to make enquiries to or use for place in queue. Unchecked queues, and waiting lists, will not be available for enquiry and place in queue in ACE Agent or ACE Interact.
In the Description column you can enter an alternate descriptive text to be seen in ACE Agent Unifinder and ACE Interact, in the list of queues and waiting lists used for enquiry and place in queue. For the queues and waiting lists that do not have an alternate text, the agent sees the normal name of the queue/waiting list.
In the Task type for place in queue column you enter a task type to be used if a call is placed in the queue, described in Place contacts in queue.
View agent resource per queue
To see how many and exactly which agent that have the appropriate skills and access right to serve a specific queue you can the select the queue name and click on the Agents button.
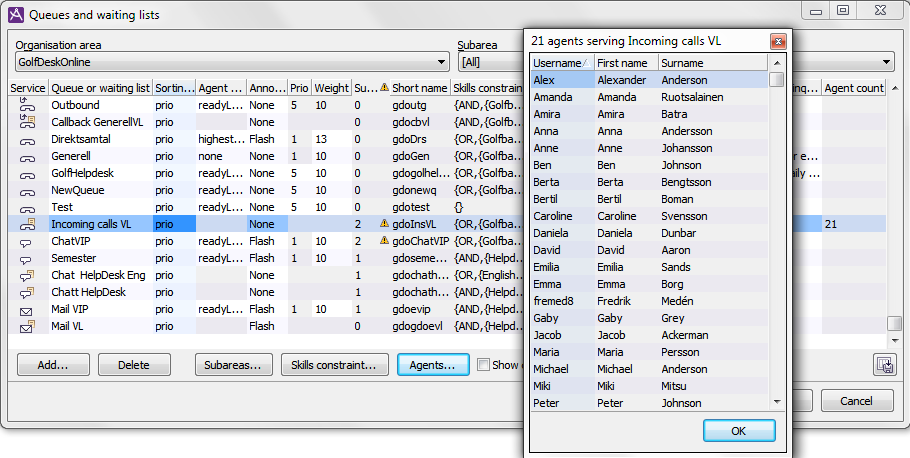
At the top of the window then opened you see the number of agents and beneath the user names of these agents, as well as first name and surname. When you close the window, a column titled Agent count is added to the right in the the Queues and waiting lists window. In this column you see the number of agents which can service the selected queue, seen the skills constraints of the queue. You see the number of agents for the queues when you have used the Agents button during the session in progress. This information is not saved.