When you have opened the Campaign details window using the New... button it looks as the picture below. Pink fields are mandatory, i.e. they have to have a value in order for the OK button to be available.
To create a new campaign, regardless of campaign type, you start by specifying a name:
Campaign name
The name of the campaign in plain text. This will later be seen as queue name in ACEAgent’s queue status window. The name must be unique within the organisation area.
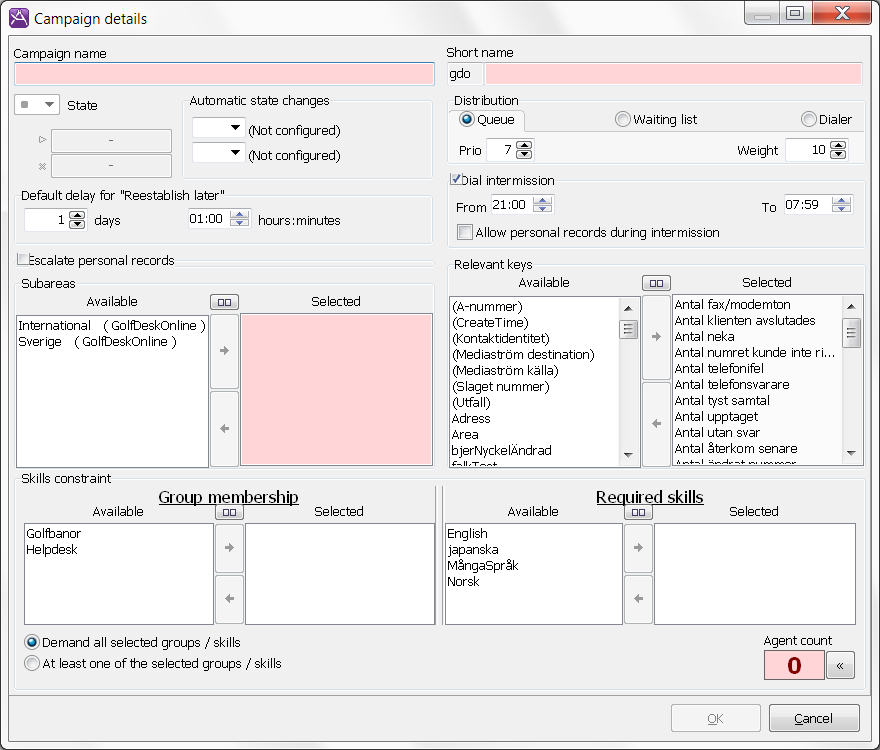
Short name
A database name serving as a unique identity for the campaign. The organisation area is already filled in and you choose the other letters, up to 13. The name must be unique within the organisation area.
In the following two sections you find a description of how you continue creating a new campaign of each campaign type; Preview and Dialer. The sections after describe what the two campaign types have in common.
Preview – select queue/waiting list distribution
To create a new preview campaign, where campaign records are dialed by ACEAgent, you tick either Queue or Waiting list under the Distribution title:
Queue
If your choice is Queue, campaign records will be routed directly to the agents. The priority of the campaign calls in relation to the calls in other queues are specified by Prio and Weight
You can change the default values (Prio 7 and Weight 10). Facts about priority and weight factor are found in the section on ACE help web describing queues and waiting lists.
Waiting list
If your choice is Waiting list, the agents can have their pick among the campaign records that are going to be called.
Other configurations in the Campaign window are the same for both preview and dialer campaigns.
Dialer campaign – select dialer distribution
To create a new dialer campaign, where campaign records are dialled by a specific IVR named ACE Dialer, you tick Dialer under the Distribution title.
When you have selected Distribution, Dialer you have to enter another five parameters:
Example of configuration and approximate result:
Time for no reply is 30 seconds Over dialling is set to 55% The limit for silent calls is set to 5%
If the reply frequency for the called people is approximately 65% and times in call are 2 minutes, the configuration above will result in 3.4% silent calls and a ready time for agents of approximately 20 seconds.
In the dialerPrebookNoAnswerExtraTime system parameter you can extend the ringing time for calls that are made by dialer with pre-booked agent (that is, both personal records and general records requiring pre-booked agent). A specified number of seconds of extra ringing time is then added to the campaign’s configured maximum ringing time described above.
IVR location
The name of the dialer IVR responsible for the ring out of the campaign.
Overdiall ratio
A value between 0 and 100 specifying the limit for the over dialling. The parameter value regulates the probability of silent calls being caused, not a percentage ratio of extra calls calculated by the number of ready agents. See below. If this parameter is set to 0 no over dialling is being used.
Overdiall limit
The maximum portion of silent calls. Enter the size of the allowed portion of silent calls in percent of the number calls made so far, e.g. 5 % per campaign. Overdiall is terminated if the limit is reached.
No answer
The time before a call is considered not answered. When the IVR makes an outbound call and it is not answered within the specified time, the call is considered not answered. By following up the number of silent calls in statistics, you can create conditions for reaching an acceptable level of silent calls. Once you have found an acceptable level for a campaign, ACE will, in continued operation, consider variants in reply frequency and number of ready agents.
A-number
Select the number to be displayed to the called customer. The full description is changed in another window; A-number for campaign.
Allow foreign personal records
Decide whether agents working with this campaign can receive campaign records with prebooked agent, personal campaign records, from other campaigns.
Other configurations are the same for both preview and dialer campaigns. These configurations are described below for both features.
Create campaign - details in common for Preview and Dialer
In addition to giving the campaign an organisation unique name and picking the distribution type, there are a number of other choices you have to make before a new campaign is created.
State
A campaign can be in started, stopped, limited or ended state. When a campaign is created it is always stopped. You cannot change the status of a campaign until the campaign is actually added to the system, i.e. when you have clicked on OK.
Automatic state changes
Plan when the campaign is to be started, stopped, limited or ended. You can plan up to two automatic status changes and enter the desired date and time for each change.
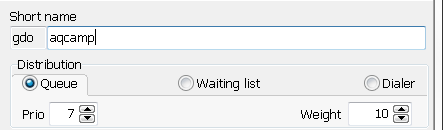
Default delay for Reestablish later
For the Reestablish later feedback in ACEAgent, the agent can always choose the time to call the customer again.
Default value is that the customer will be called again in 25 hours. In ACE Admin you can change the default value, as a suggestion to the agent, by specifying the number of days, hours, and minutes that shall pass before the agent is called again.
Escalate personal records
If the time to call a personal campaign record has been passed by a specified time, at the same time as the responsible agent has been logged out from the campaign, the campaign service, or from ACEAgent, the record can be escalated to all agents servicing the campaign. If you mark Escalate personal records, you shall also specify the time after the record should have been called, that an escalation will take place, in days, hours, and minutes. The lowest value you can specify is 5 minutes.
Dial intermission
Ring-out of records in a campaign can be automatically stopped for specific hours during the day, for example that no calls are made between 21:00 and 08:00. If you will be using dial intermission, you specify From which time in the day that the intermission should be applied, and To the last time the intermission shall still apply.
Allow personal records during the dial intermission
You also choose whether personal campaign records for this campaign should be allowed to pass through during the dial intermission, or whether all types of records shall be blocked. If e.g. agents usually agree with customers to call late in the evening, this could be a reason for allowing personal campaign records to be made during the dial intermission.
Subareas
This is where you select the affiliation subarea(s) for the campaign. Subarea affiliation must be stated to get relevant statistics for the campaign.
Relevant keys
From the Available list you select the contact data keys to be connected to the campaign in question. In the Selected box you see the required contact data keys for call records. These required contact data keys cannot be deselected. The pre-defined contact data keys that cannot be included in campaign records are displayed with parentheses around the name. These keys can be used in campaign unique contact data windows.
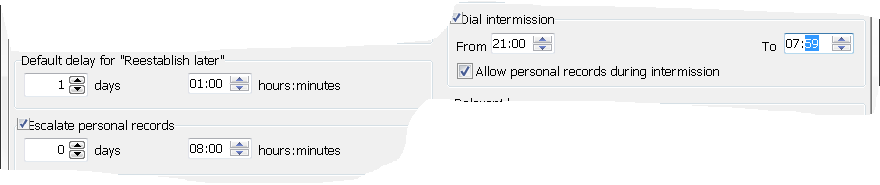
Skills constraints
Select the group affiliation and/or skills the agents must have to be allowed to service the campaign in question. In the list for Selected skills you also select the skill level using a figure. A click on the figure farthest to the right displays a scroll list from where you can select a higher, or lower, skill level. Skill levels are described in more detail in web help sections about groups and skills.
To be logged in to the service campaign you need Execute service for campaign calls, queue, or Execute service for campaign calls, waiting list in your access role.
By selecting one of the Demand all selected groups/skills..., or At least one of the selected groups/skills... radio buttons, you decide whether agents that will be serving the campaign must belong to all selected groups, and/or skills, or only at least one.
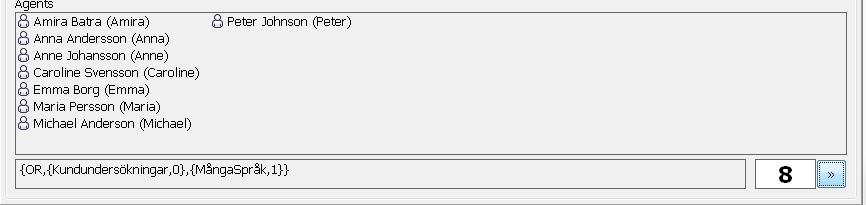
In the small Agent count box, you see how many agents that meet the skills constraint you have selected.
The » button next to the indicator is there for you to click on to see a list of which agents meet the constraints, and/or to check the constraints in text. The list is closed using the same button.