In the Person tab you can, among other things
- search for people in different systems using different combinations of search criteria,
- enter telephone numbers to call,
- find more individuals with the same characteristics as an already found individual.
In the following section you find a description of the standard functionality in Unifinder. Specialities for the various UC systems that can be connected to the ACE solution are described in their own respective sections.
- When the UC system is Microsoft Skype
- When the UC system is Marvin
- When the UC system is CMG
- When UC system/PBX is Touchpoint Plus
- When the switch is Skype for business
Below the field(s) where you enter search words you see the search result to the left and detail information to the right. Before you use the Person tab you may have to make settings in the search result to make Unifinder search and present information in the order you want.
Columns in the search result can regulate how and what you can search for
In the search result you see a pre set number of columns in a given order, such as
| Presence, as an icon | Surname | First name | Status | Telephone number to work | Email address |
It is up to you to pick which columns you want to see or hide, and you can also switch places for the columns. This is described below. Which column titles Unifinder can search by depends on whether there is a connection to a UC system, and which one it is. The standard is name search with a space between first name and surname.
In many UC systems the relative order of the first name and family name columns regulate whether you enter first name of surname first, as described in section Basics about searching in Unifinder. One exception is e.g. Telia Touchpoint Plus. The number of columns and their belonging title texts also vary.
The titles you cannot search by, even though they may be visible in the search result, are:
- Status,
- Stop time for activity,
- Work level,
- Custom work level.
Some titles can only be seen as detail information, meaning that they can present facts but you cannot use them for search.
Select columns, their relative order and width via context menu
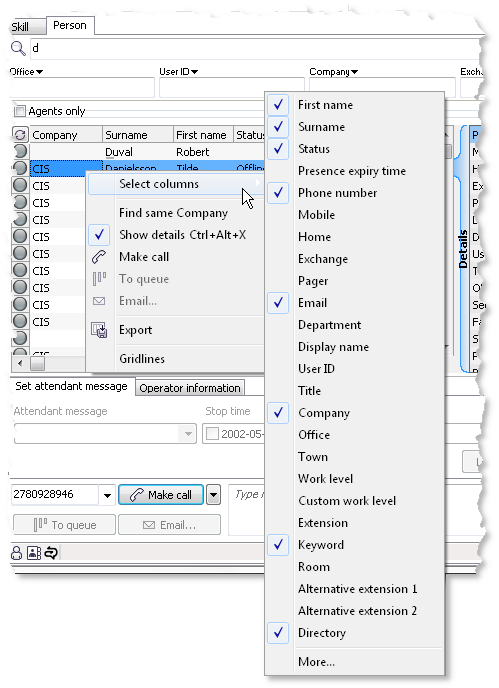
To specify visible columns, the order in which you want to see the headers, and the width of each column, you right-click in the search result and select the Select columns menu choice.

The titles that are visible in the search result are ticked in the menu.
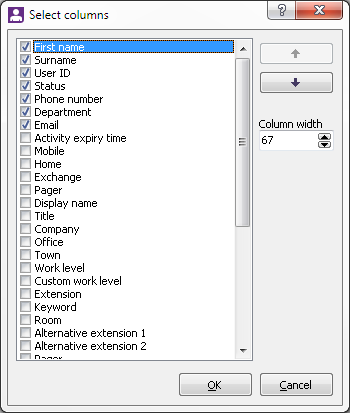
To display or hide a column, you just click on its header name in the unfolded list. At the bottom you see the More... choice, opening a new window where you have the option of specifying in more detail how the columns shall be presented.

- Select the titles you want to be visible in the search result, either by checking the matching checkbox. Hide the headers you do not want Unifinder to search information for, by removing a tick from the checkbox.
- Define the order for the visible headers, by selecting a header name and using the up and down arrow buttons to the right in the column window. The header at the top will be seen farthest to the left in the search result.
- You specify column widths in number of characters by selecting a header name and entering and selecting figures from the drop-down menu.
- Save with OK.
You can also change the column order directly in the search result by placing the mouse pointer on a column header and drag to another position. Column widths can also be changed directly in the search result. Place the mouse pointer between to column headers. The left column becomes wider when you press and hold the left mouse button, dragging the mouse pointer to the right.
Screen reader column
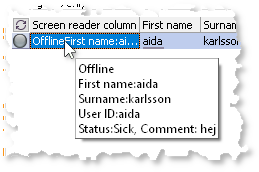
There is also a special column – Screen reader column – available, that in a single table cell summarises all other visible columns in a way that is intended to facilitate users of screen readers, so that the contents of the entire row can be read without having to traverse the individual columns.
The contents of the screen reader table cell is composed of column header and cell content, for each visible column with a non-empty cell, except – of course – the screen reader column itself. Each column is separated by a newline in the summary, and the first entry is always a textual representation of the icon in the leftmost column, be it a queue icon or an online state icon.

The screen reader cell content for the column configuration in the sample image, for the user aida karlsson
above could be something like the text hinted in the image below.

Note that Phone number, Department and Email is omitted from the screen reader text, since those cells are empty for aida
. Furthermore, the Status contains a comment, so this is also included in the status line.
Telephone number, and mobile status display
The telephone number you see in the preset column setup in the search result is for the selected individual’s work station telephone. However, you do not have to add all columns relating to telephone numbers in the search result to se any other numbers. If the sources can present numbers to the person’s mobile, switch, pager, and/or home, you see these both in the search result/detail information and above the Make call button at the bottom of the Person tab.
In Unifinder you can, for specific mobile numbers, also see whether they are busy in calls or ready. To see the mobile number’s status it is required that they use a specific Telia telephony service and that a parameter for line status is set in ACE Admin. Line status is then seen as a small orange or green icon next to the relevant mobile number in the search result table (if this column is visible, else in the detail information) and in the list of numbers that can be called.
Detail information in its own view to the right of the search result
The columns you do not see in the search result can be found in a detail view to the right, for the selected row.
There are different ways to show or hide the detail information:
- Use the Ctrl Alt X shortcut command,
- Right-click in the search result to open a menu. There you choose Show details,
- Double-click on the dividing bar to the right of the search result.
You can also decide the size of the area, i.e. to see more, or less, of the detail information you click on and drag the dividing bar between the areas.
You also have the option of hiding the fields that do not have any value. Right-click in the detail view to see the context menu there and select Hide empty fields.
In the same menu you find the Copy option. Thereby you can use values in the detail information fields at other locations in Unifinder. For example, select a telephone number, copy, and paste it into the main search field and call directly by pressing the Enter key. This is how you proceed:
Copy with Ctrl C or by selecting Copy in the context menu,
and paste with Ctrl V or by selecting Paste in the context menu.
Some detailed information also becomes visible when you move the mouse pointer over the status icon for the selected row.