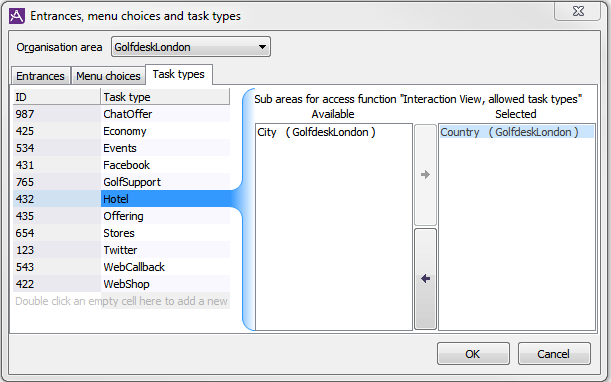
Task type is a special contact data key, as ACE can gather statistics about contacts, organised by values of the task types.
- When you create a new organisation area you automatically get default task types created for incoming email and callback.
- For phone calls a task type can be configured to be set in the IVR.
- For chat, the task type can get its value from what is selected in entry fields in ACE Agent Chat or via the web link the customer clicks on to chat.
- For incoming emails the task type definition is normally made in ACE Email Server.
- All contacts distributed via the ACE Email can have their own task types In the Task type assignment for email and work item window, found under the Statistics menu in ACE Admin, you can configure rules to set task type based upon contact data. Thereby even social media messages can have separate task types. You can e.g. have text messages categorised, and then connect each category to a task type used in routing and statistics. Also see Methods for categorisation.
- Task types are important when you Set wrapup rules for the agents handling emails and incoming calls, as some task types may need their own settings.
As with other contact data keys, entrance, menu choice, and task type can be used in routing rules. See The Routing of contacts window.
If you are interested in gathering statistics per entrance and menu choice you can make combinations of entrance and menu choice to correspond to a task type.
A contact centre has two telephony entrances, 020 456789 and 0771 456789. The customers calling the contact centre can select between two menu choices; order and support.
If you want to be able to gather statistics categorised by both entrance and menu choice, you can have four task types, designated 1-4., e.g.
1 = 020 456789 and order
2 = 020 456789 and support
3 = 0771 456789 and order
4 = 0771 456789 and support
Add a new task type
The Statistics | Task types... menu choice leads to the The Entrances, menu choices and task types window where you can add and delete task types and change their names. Adding a task type means specifying a valid value for contact data (with the key) task type.

Each task type belongs to a particular organisation area. A task type can also be connected to a specific subarea, to restrict access to sensitive information in the ACE Interaction View contact archive. Interactions without task type, or without restrictions, belong to the organisation area where contacts have been handled and can be seen by all agents belonging to the area. The same task type can be specified for different organisation areas and subareas.
This is how you add a task type:
- In the drop-down above the Task types, choose Organisation area in which the task type will be used.
- Click on the first empty text field from the top and enter an ID
- A task type’s ID consists of 3 characters, digits and letters that shall uniquely indicate precisely this type of task. The database allows a maximum of 2,000 task types to be entered.
- Digits shall be in the 000 – 999 range but you can also combine the digits with characters, such as A00-A99, B0e-B9,…T00-T99. ACE does not distinguish between upper case and lower case letter here.
- The same ID number can be used in several organisation areas.
- When contacts are escalated between organisation areas the task ID follows the contact and is accounted for in the statistics under the task type having this task ID in the new organisation area. It is thus important that the ID exists in the organisation area where contacts that are escalated in are answered.
- Enter a short descriptive name under Task type.
- The task types can now be connected to designated subarea(s). Select one or multiple subarea(s) by moving name(s) from Available to Selected.
- Save with OK.
Delete task type
This is how you delete a task type:
- Open the Task types tab in the The Entrances, menu choices and task types window.
- Select the task type's name.
- Press the Delete key or select Delete in the context menu.
- Save with OK.