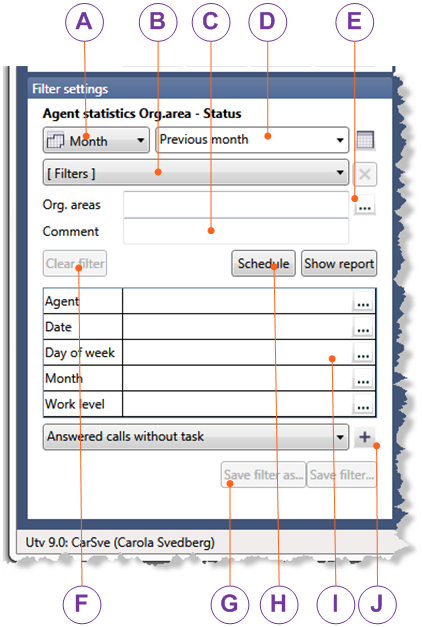
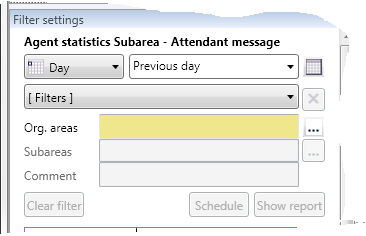
When you have selected a report from the Report picker list, you can filter to see more exact details. Under the Filter settings header you configure both ruling terms such as time, organization area/subarea, task type, queue etc. and even pure statistical data such as weekdays and names of agents. Yellow colour is for mandatory fields.
 to the right remove selected saved filter that is not published
 Open a window where you choose organization area or subarea. Open a window where you can select filter parameters such as specific agent names, weekdays, times etc.
 Choose more statistical concepts to use as filter parameters.
Time unit
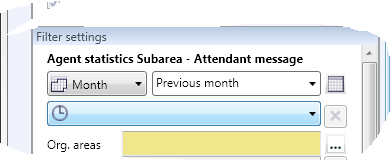
At the top of Filter settings you see the name of the report you selected in the report list. Below that you shall pick the time unit that the report will be presenting. The following four time units are used in statistical reports:
-
 Current situation Currently just for one report for campaigns
 -
 Day
Day
-
 Week
Week
-
 Month
Month
Which time unit you can select is depending on the type of report you have selected in the report list. The only time you do not have to choose a time unit is if you have selected a report based on current situation.
A tailored report can only be configured for a given time unit. If you want to cover the need for different time units for a report you must create several tailored reports, i.e. one for the day time unit, one for week and one for month.
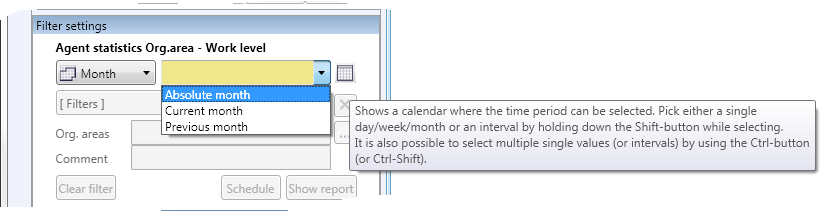
Time period
When you have selected time unit, you must specify time period. In the list, choose between:
- Absolute
- when you will be looking at a report for specific dates or creating a report job that will be scheduled to run once.
- Current
- to see a report with statistics for today's date/current week/current month (depending on the report's time unit). This relative time period can be used when a report is going to run periodically from a schedule.
- Previous
- to see a report with statistics for yesterday's date/last week/last month (depending on the report's time unit). This relative time period can be used when a report is going to run periodically from a schedule.
Absolute time – specify date or time interval
When you select Absolute, the list is changed into a field where you enter a date, or you fill in dates by picking them from the calendar to the right of the field.
You supply dates somewhat differently depending on the time unit for the report. Below you see examples where YYYY is the year in four figures, MM is the month with two figures, DD is the date (the day in the month) with two figures, and WW is the week number with two figures:
Daily reportYYYYMMDD, e.g. 20120325
Weekly reportYYYYWW, e.g. 201236
Monthly reportYYYYMM, e.g.201203
Interval is specified with hyphen - between the first and the last date. Several different dates or intervals are separated by commas ,. The ways in which you can specify absolute time periods when the time unit is day, are the following:
- One day e.g. 20120820
- Comma separated list of single days e.g. 20120128,20120130
- Interval of days e.g. 20120820-20120825
- Comma separated list of intervals e.g. 20120701-20120710,20120820-20120825
- Comma separated mix of the variants above e.g. 20120701,20120820-20120825
When you have specified your dates, you verify them and continue with the Tab or Enter key.
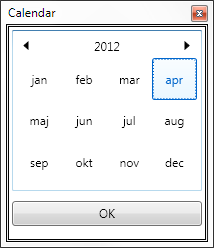
Pick dates from the calendar
If you are using the calendar, this will provide the correct format for the selected time unit, i.e. if you have selected the month time unit and select one single day in the calendar, ACE Report will supply year and month for the selected day.
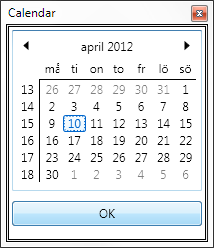
A few tips on how to work with the calendar:
To search backwards in the calendar quicker, you can click on the month name at the top to see the year.
To produce a date interval you hold down the Ctrl and Shift keys while you select the first day, proceed to the last date, select it and click on OK.
If you want to select several separate dates you hold down the Ctrl key.
Use saved filters again and/or specify new values
Via filter settings you can complete the selection criteria for the statistics you want to view in a report. Should any ruling filter parameter be mandatory, this field is yellow.
In a drop-down menu you find earlier composed filters that you can use again. If you hold your mouse pointer over the name of the filter, you see, in a help text box the parameters included. You see the primary filter parameters in the list of items you can select further down in Filter settings as well.
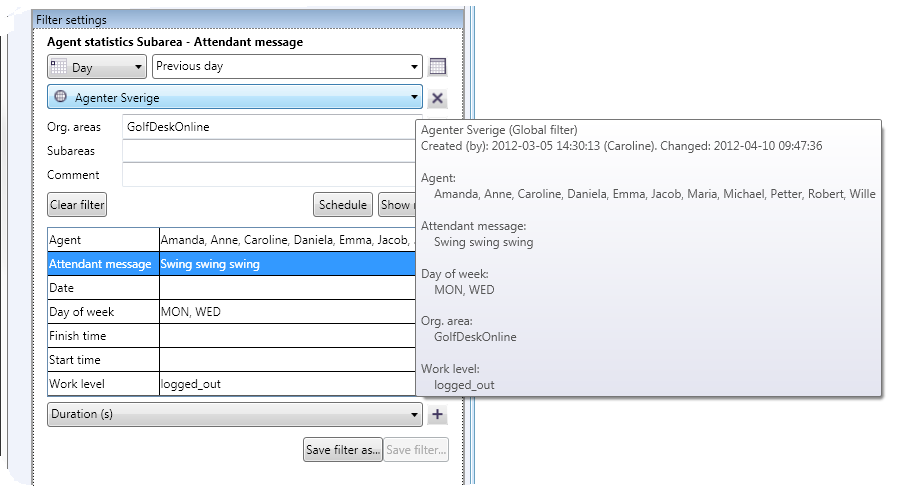
Filters in scheduled reports
The advantage of using a named filter is that if the filter is modified, all scheduled reports using this filter will automatically consider these changes the next time the jobs are run.
Manually configured filter settings that are mad in connection with modification of a report job is seen by a clock symbol in the drop-down menu with saved filters. This indicates that the filter is unique for this scheduled job.
Remove a saved filter
If you want to remove a filter you have saved before, you click on the cross  to the right of the filter name. If the filter has been published by someone else, or for some other reason must not be removed, a warning message is presented.
Select filter values in filter parameter window
The ... button to the right of a text field opens a small window where you see different choices, depending on the filter parameter involved.
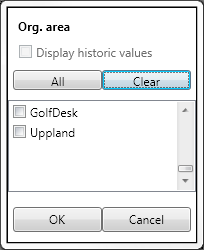
When ACE Report is fetching filter values for a specified date interval, this is primarily done through a search in the statistics database. For some parameters, however, the values configured in ACE Admin are seen as filter values. In some cases you can or must fill in the values yourself for the selected filter parameter, such as e.g. number of seconds. Below, a few examples of such filter parameter windows.
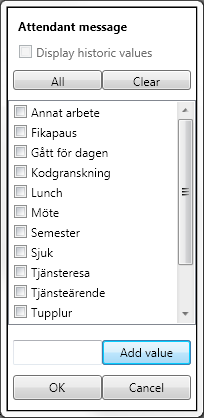
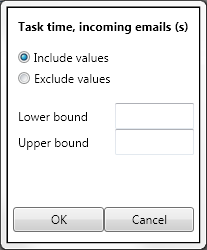
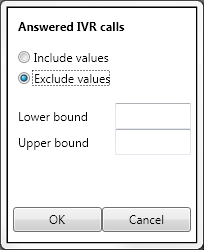
The following choices are common for many filter parameter windows:
- Display historic values
- If there is a value set with historic values that can be used for filtering, such as agent or queue names that no longer exist in ACE Admin.
- All
- Selects all options in the window.
- Clear
- Unselects the selected options in the window.
- OK
- Saves selected filter values and closes the window.
- Cancel
- Closes the window and no values are transferred to the belonging text box.
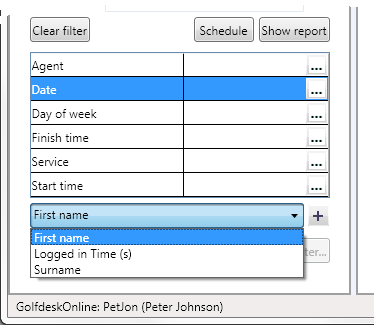
Below the table with the primary filter parameters there is a list with non-ruling, more secondary, concepts.
To add one of these concepts from the report's statistical collection to the filter settings, you proceed like this:
- Select the row with the concept
- Click on the plus button +
- Select values in the opened filter parameter window and click on OK
The parameter with the selected value is then seen among the primary filter parameters.
The parameters you have opted to filter by can be saved for future use. You select, depending on your access rights and if you are using an existing filter, to save the filter as a global or a personal filter, with a new or unchanged name.
The Clear filter button clears the Filter settings so you can start completely afresh.
If you are not interested in any specific filter you do not have to make any filter settings but you can click directly on the Schedule button or View report button. If you want the selected report to be seen with a specific comment you can specify the text to be seen in the report header later.