To add a qualification rule in the ACE Admin Proactive Web window, you start like this:
- Select in the top drop-down menu, the Organisation area in which the rule shall apply.
- Then select a tab for what the surfer shall have done to see an offer. Rules with the two different qualification types behaviour qualification and direct qualification can be active simultaneously, on the same web pages.

- Behaviour qualification
- In rules for behaviour qualification you specify a number of web page addresses, even maybe in a specific order, towards which the surfer’s behaviour pattern is then matched.
The surfer can, if any evaluation constraints have been filled, for example see an offer when a specific sequence of specified web pages have been passed within a specific time.
- Direct qualification
- With direct qualification, the surfer gets, if any evaluation constraints have been filled, an offer to e.g. terminate a purchase in progress or to click on a button, such as ”Contact me”.
In a direct qualification rule you specify addresses to the web pages containing the JavaScript code required for direct qualification to function.
How to add data to all field on both tabs
In the following list you see how to add a rule via the Rules for behaviour qualification tab. In the Rules for direct qualification tab some of the fields described below are missing, but in all other respects both tabs in the Proactive Web window function in the same way.
- In the Short name field you are to add a few letters to provide the rule with a suitable database name. You choose between
- double-clicking on the first free row under the Shortname title,
- using the Insert key on your keyboard, or
- selecting Add in the context menu.
- A figure is automatically added under the Order (original) title;
0, for the first created rule, 1 for the second, etc. Several rules can be simultaneously active and surfers then receive offers according to the first rule matching his activities, i.e. the rules are evaluated in order, top to bottom. To change the rules’ relative order, you select one row and move it with either of the arrows in the middle of the window. The one placed at the top will, when you have saved, assumes the value 0, the second 1 etc.
- Under the Name title you enter a descriptive name for the rule.
- Select whether the rule shall be Active or not. Several rules can be active at the same time, on both tabs, and the surfer then receives an offer according to the first rule matching his activities from each respective tab; see Order above.
- On the Rules for behaviour qualification tab, Throughput (%) is automatically filled in with the value 100. The percentage informs about how many of the qualified surfers that may get an offer. You can see this as cooperating throttles. If you find both support pages with many surfers, and a sales page where not so many people are surfing, on the same web page, you can make more contacts being established from the sales pages by tightening the throttle opening by a few %.
You lower the throughput for the current rule by entering a lower digit. If there should be too many visitors qualifying for an offer, you can randomly sort away e.g. 20 % by specifying 80 %. This setting is not used for direct qualification.
- On the Rules for behaviour qualification tab you find the Qualification type title. Select movement pattern from the drop-down menu, i.e. what the surfer shall have done to be presented an offer:
- Visited X pages within Y seconds, i.e. present the offer when the surfer has passed the specified pages within a specified time. Can be used to catch the one seeming to search around at a limited part of your website.
- Visited X pages and Y seconds have passed, i.e. present the offer when a specific sequence of specified web pages have been passed within a specified time. Can be used to catch a person, who, in a purchase flow, seems to be needing help to finish the purchase.
- Visited X pages in a sequence and Y seconds have passed, i.e. present the offer if the surfer breaks a given sequence in his surfing, having stopped at a specified page for a specified number of seconds. Can be used to catch a person seeming to be interested in a specific page.
- Breaks a given sequence or Y seconds have passed at one page, i.e. present the offer when the surfer has deviated from specified pages or when the website visitor has had one singe web page open for a specified time. Can be used to catch a person interrupting and hesitating in a purchase flow.
- Then add the relevant number in the X pages and/or Y seconds fields.
In rules for direct qualification there are no alternative qualification methods, because qualification is carried out directly when the surfer clicks on a button, or something else regulated in a specific code at the website.
- With Delay (s) you can delay the presentation of an offer by an optional number of second, to allow the surfer to take part of the content of a web page before the offer covers parts of the page.
- Optional - add a descriptive text in the Comments field.
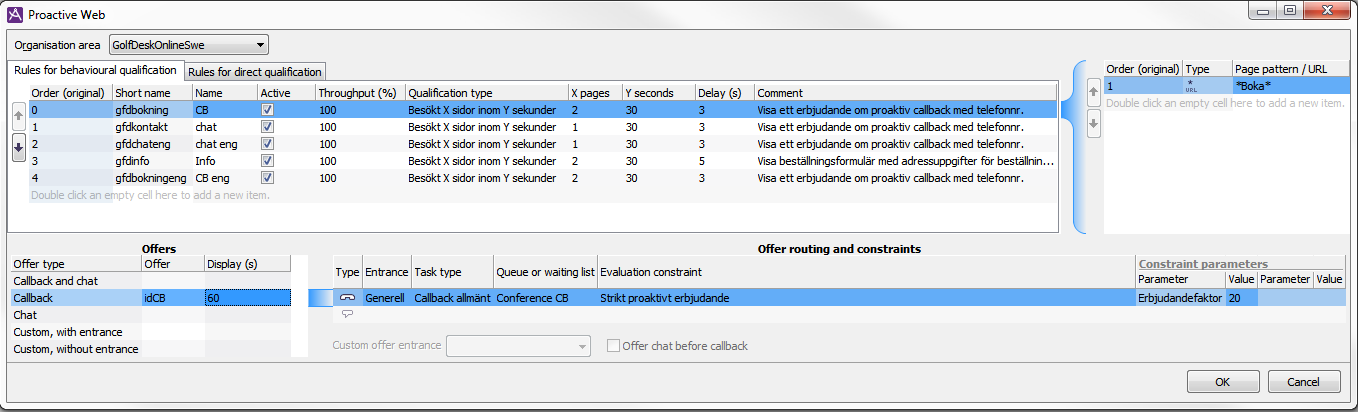
- As soon as you have chosen a short name, the Page pattern/URL becomes available at the top right. This is where you specify addresses to the web pages the rule embraces.
- Because the Proactive Web window can handle ”drag-and-drop” you can drag a web page address from your web browser to the Page pattern/URL. If you specify entire the URLs you can later easily see which pages that are embraced by the qualification as they are opened when you click on the symbol under Type. You can also specify a website by using an asterisk * in your URL as a so-called wild card character. It will not be clickable but ACE can still use it to know under which part of the surfers shall be registered.
- For web pages you must use the Order (Original) header. If you have selected, in the Behaviour qualification tab, that the surfers hall have visited X pages in a specific sequence, it is important that your specified web pages are in the sequence you want them. The first web page is the one seen placed at the top of the Page pattern/URL.
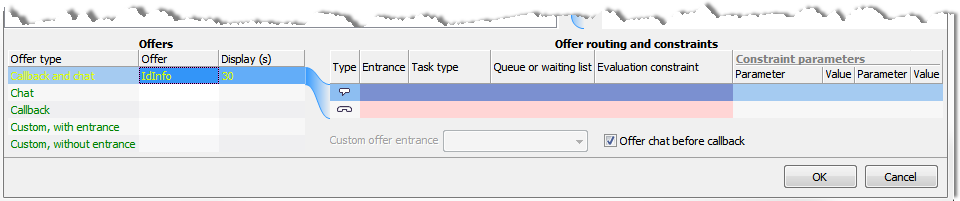
- In the bottom part of the window you regulate which type of offer that shall be given. You can choose one or more offer types:
- Combined offer for chat and callback, such as ”Would yo like to chat with an agent or do you want us to call you?
- Chat only, such as ”Would you like to chat with an agent?”
- Callback, only, such as ”Would you like us to call you?”
- Adapted offer connected to an entrance, such as ”All agents are busy- Please, try again later.”
- Adapted offer that is not connected to an entrance. As the offer can be presented also when it is closed, it can be used for general information, such as ”We are closed at present. Feel free to look at our self service offers.”
- You shall now point out the relevant Offer, by entering the name of the relevant form the surfer shall see. The name, or actually the ID, must correspond to the tag of the data-offer-id type in the HTML code that is hidden on the web page.
- When you have entered a name/ID as specified above you can, under Display specify the number of seconds the form skall be seen. The longer time, the fewer offers per time unit. If the time is too short, the user does not have the time to answer the offer before it disappears. If the time is too long, maybe the queue situation changes. Suitable value is up to one minute, depending on e.g. how much text the surfer is supposed to have time to read.
- When you have filled out the web form ID, different fields become active under Routing and constraints for offers, depending on the offer type selected. If you click in the Display field, you see via a colouring exactly which fields that require data.
- Depending on the selected offer type above you can specify different Evaluation constraints, i.e. what ACE shall check before an offer is presented:
- Only opening hours only considers the opening hours of the contact centre.
- Min agents, Max queue positions first checks the opening hour and then considers the lowest number of agents that shall be logged in (not just ready), combined with a maximum number of contacts in queue. The values are given under the Constraint parameters title to the right.
- Min agents, Queue positions per agent first check opening hours and then considers the lowest number of agents that shall be logged in, combined with a maximum proportion of contacts in queue per agent, specified in percent. The values are given under the Constraint parameters to the right.
- Strictly proactive offer is used if you want to make sure that the person offered contact indeed is helped immediately. ACE automatically checks opening hours and number of ready agents. What you have to specify is Offer factor under the Constraint parameters title to the right. Since all surfers do not accept your offer you can have more offers presented than there are ready agents. If the offer factor is, for instance 20, 20 times more offers will be presented than there are ready agents.
- Save with OK.
| Offer type | What to configure |
|---|---|
| Chat callback
and Chatand Callback |
Select the Entrance the web contacts shall be routed through. Entrance choice indirectly regulates the opening hours. Which opening hours that apply for the various entrance are seen in ACE Admin under the Routing | Opening hours... menu choice.
Select Task type. Contacts having arrived to the contact centre via the current rule automatically receives the selected task type for this contact data. The task type can later be used to find exactly these contacts in ACE Agent Interaction View and in statistics via ACE Report. Select the name of the Queue or waiting list the web contacts shall be routed to. Before the surfer is offered to be contact, the queue situation in the specified callback or chat queue is checked. Several rules can use the same queue/waiting list. If you, in the checkbox, selects that chat is to be offered before callback the order in the list to the left is also changed, in order to make it evident what is offered first-hand and second-hand respectively. |
| Adapted, with entrance | Select the Entrance to be connected to the current offer. The opening hours for the entrance regulates whether an offer connected to the entrance can be shown. |
| Adapted, without entrance | Nothing specific is entered here. The offer type just has to be connected to a form ID. |