Under User | Users with skills and groups you can change which users that are included in a particular group and which users that possess a particular skill. You can also specify the level of a user’s skill.
The Groups and Skills tabs have similar structures and functions. The latter tab offers the potential to set a figure for the skill level as well. The skill level is not relevant when dealing with groups.
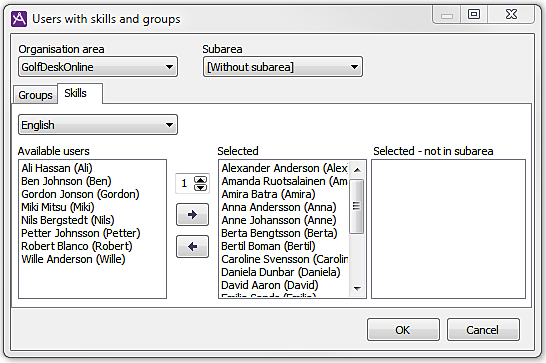
At the top of the tab there is a drop-down list for specifying which skill/group you want to work with. To choose a required skill/group, you first have to choose Organisation area and Subarea in the appropriate drop-down list. The subarea list, in addition to the subareas in the chosen organisation area, also contains the Without subarea option. If you choose Without subarea, the drop-down list for skills/groups will contain the skills/groups that do not belong to any of the organisation area’s subareas.
The choice in the Organisation area list controls the selection of users shown in the window. This selection will also be affected by whether a specific subarea or the Without subarea option is chosen in the Subarea box.
The choice in the Subarea box, along with the users’ skill/group affiliation, controls how the users are distributed between the three lists Available users, Selected and Selected – not in subarea.
Users in the chosen subarea can be moved between the Available users and Selected lists. The Available users list shows users who are included in the relevant subarea, although not in the specified group/skill. The Selected list shows users who are included in the relevant subarea and also in the group/skill.
A third list – Selected - not in subarea – shows users who are included in the group/skill but not in the chosen subarea.
If the Without subarea option is chosen in the Subarea list, all users in the organisation area will become available for distribution between the Available users and Selected lists. So the Selected – not in subarea list is left empty.
To change the set of users with a particular skill (included in the skill):
- Select the organisation area in which the skill is included.
- Select a subarea that contains users whose skill affiliation is to be changed.
- Select skill.
- For each user you want to be part of the skill:
Select the user in the Available users list, select the skill level by browsing to the correct number with the up/down arrows, and click on the right arrow. - For each user not to be included in the skill any longer: Select the user in the Selected list and click on the left arrow.
Carry out steps 2-5 for other subareas whose users are to be added or Deleted from the skill. If necessary, repeat this for the Without subarea option in the Subarea list.
- Click on the OK button.
Changes to the set of users who are included in a group take place in basically the same way, i.e. as in the points above. The only difference is that a group does not have a skill level. The choice of skill level in step 4 is not included in the process.
You can move more than one user at the same time, provided they are listed after one another. In the example below names are moved from the Available users list to the Selected list.
- Press and hold the Shift key.
- Click on the first name you want to select from the list and then on the last name.
- Move the names to the other list by clicking on one of the arrows, in this case the right arrow button.
- Click on the OK button.