Server based CTI is configured in the Switches for server based CTI window that is opened via the Switches button at the bottom right of the Locations, switches, and access codes window.
To configure switches you require Own switches in your access role.
The Switches for server based CTI window is divided into four sections, described in the following overview picture. For details see Configure switches for server based CTI
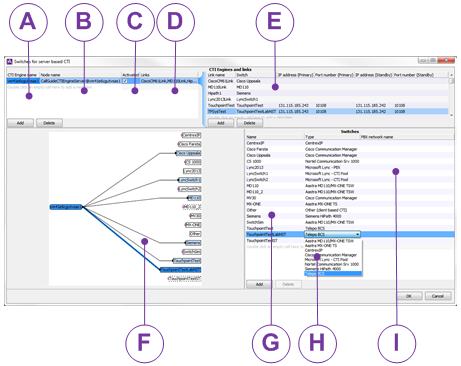
Enter a descriptive name of a CTI engine here
Enter the name of the node where the CTI engine is located.
Tick if the CTI engine shall be active.
You see a list here of the links that the selected CTI engine is connected to. Not changed here.
This is where you see a detail view of the row selected to the left, i.e. the configured links for the selected CTI engine.
Here you can enter the names of the links to be used at communication between the selected CTI engine (to the left) and the various pre-defined switch types (to the right). If it is for a service based PBX, such as Centrex IP or Touchpoint Plus, you also see the IP and port numbers that are used for connecting to the technical environment of Telia Company.
Here you can enter the names of the links to be used at communication between the selected CTI engine (to the left) and the various pre-defined switch types (to the right). If it is for a service based PBX, such as Centrex IP or Touchpoint Plus, you also see the IP and port numbers that are used for connecting to the technical environment of Telia Company.
An overview picture with all configured CTI engines to the left, switches to the right and between that, all the links that connect them. What you select in each table is seen marked (darker) in the picture.
Specify switches with descriptive names here.
The switch types are pre-defined and you pick them from a drop-down list
This is where you can specify so-called net groups and then point out which PBXs that belong to each respective net group
To add a CTI engine, a link, or a switch, you double-click on the first empty row, or select Add from the context menu.