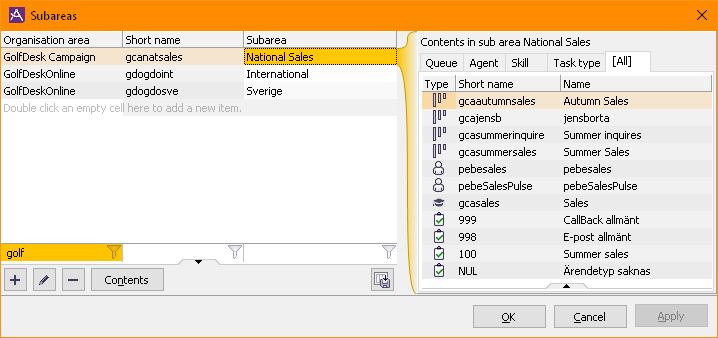
An organisation area can be divided into subareas. The use of subareas rather than just organisation areas provides greater flexibility at the expense of slightly higher complexity.
To the subareas of an organisation area you can i.a. link:
- Users
- Skills
- Queues and waiting lists
- Campaigns
- Schedules
The subareas can overlap, in order for e.g. a particular user to belong to more than one subarea. This means that statistics and real-time information for the subareas can overlap if agents, queues or waiting lists belong to more than one subarea.
Functions for handling subareas are found under the Organise | Subareas menu choice. This is where you can create and delete subareas and change their names.

This window lists the subareas that you are authorised to configure.
Each subarea is given a unique name and short name. The subarea’s short name consists of a three character short name for the organisation area in which the subarea is included. The second part comprises a row of characters that uniquely indicate which subarea in this organisation area that is being referred to.
A subarea that is included in an organisation area with the short name “org” can be given the short name “orghelpdesk”.
There are some name-related rules:
- Two different subareas in the same organisation area must not be given the same name.
- Two different subareas in the same organisation area must not be given the same short name.
Editing subareas
All editing of subareas are done in the usual way, described in Add and change content in tables
Create new subarea
To add an area, on the empty, last row you
- select the desired organisation area,
- enter the unique short name for the sub area (it will automatically be prefixed by the selected orgainsation area),
- enter the descriptive name of the sub area.
Also, you can change the organisation area for a new (unsaved) sub area, even after the sub area short name is entered. Just make sure the names are unique in the new organisation area as well!
Delete subarea
Normally you can remove a subarea, even if there are objects connected to it. The objects, for example users, are still there, but the connection to the removed subarea disappears. Exceptions are if removal should lead to forbidden references between two objects. Removal of a subarea is prohibited, for example, if forbidden references are created between a schedule and the template days the schedule uses.
If you delete a subarea, all normal users lose the potential to view statistics for the area. However, the statistics themselves are not deleted. Users with the system manager access role can view the statistics.
View connected items
For the selected subarea, you can view its contents, i.e. items that have been connected to the subarea. Click on the Contents button to toggle the visibility of the contents panel to the right of the subarea list.
Select the desired type of object to view by selecting the corresponding tab:
- Queue
- This lists all queues and waiting lists connected to the selected subarea.
- Agent
- This lists all users belonging to the selected subarea.
- Skill
- This lists all skills connected to the selected subarea.
- Task type
- This lists all task types connected to the selected subarea.
- [All]
- This lists all of the above. Remember that you can sort, search and filter the contents, as well as export it to a file.