Under the Email | Automatic answer menu option, settings are defined for automatic processing of emails. The email address intended as sender is entered in the Email and WorkItem accounts window, on the Accounts tab, in the Return address field.
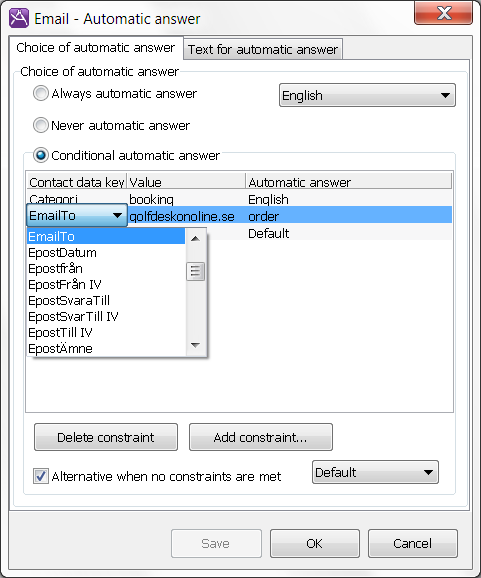
Choice of automatic answer
There are three alternatives for how automatic answers should be sent:
- Always automatic answer
- Always send the same answer. With this alternative, you can choose which text is to be used for the answer.
- Never automatic answer
- Never send an answer.
- Conditional automatic answer
- Different answers are sent depending on the received information. With this alternative, replies are sent with the aid of contact data keys. If a contact data key has (or contains) a particular value, a particular automatic answer ought to be sent. You also have the possibility to choose which automatic answer to be sent if none of the specified alternatives is correct.
To change constraints in the table under Conditional automatic answer you click on the values you want to change. You can remove the entire row using the Delete constraint button.
To add new constraints, click Add constraint:
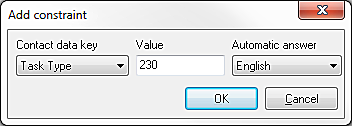
According to above, emails with task type = 230 should be answered by the “English” reply.
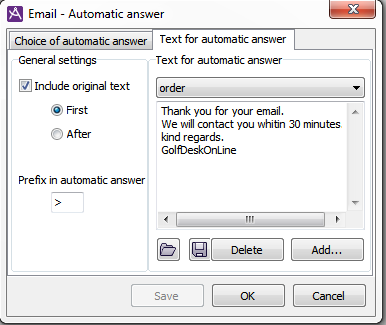
Text for automatic answer
Under the General settings header in the left part of the window you choose whether or not the text from the original email should be included in the reply. If you choose to include the original text, you will also be able to determine whether the text is to be inserted before or after the automatic answer.
Under Prefix in automatic answer, you can define how the original text should be displayed. According to the setting below, each row containing original text will begin with “>”.
- A number of texts for automatic answers can be defined. To add a new text, click on Add....
- Type the name of the new automatic text in the entry field.
- Click on OK to confirm.
- The new name can now be found in the drop-down menu under the Text for automatic answer header. Select this name and enter the text for the answer in the box beneath. The text can also be inserted from an existing file by using the
 button.
Save the new text by clicking the Save button. You can also save the text to a file by using the  button.