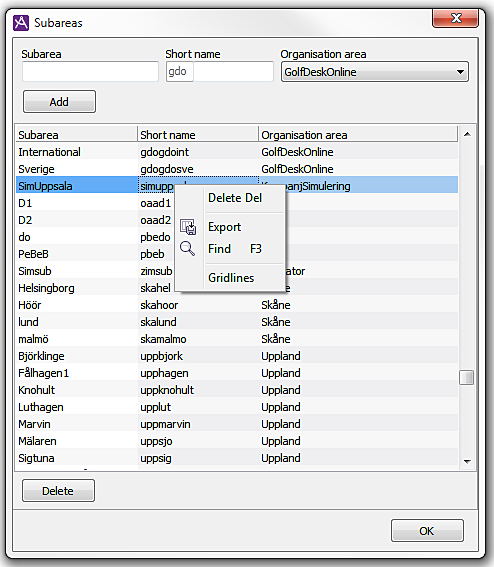
An organisation area can be divided into subareas. The use of subareas rather than just organisation areas provides greater flexibility at the expense of slightly higher complexity.
To the subareas of an organisation area you can i.a. link:
- Users
- Skills
- Queues and waiting lists
- Campaigns
- Schedules
The subareas can overlap, in order for e.g. a particular user to belong to more than one subarea. This means that statistics and real-time information for the subareas can overlap if agents, queues or waiting lists belong to more than one subarea.
Functions for handling subareas are found under the Organise | Subareas menu choice. This is where you can create and delete subareas and change their names.
In conjunction with the creation of a subarea, you specify which organisation area it shall belong to.

This window lists the subareas, which the user in question is authorised to process.
Each subarea is given a unique name and short name. The subarea’s short name consists of a three character short name for the organisation area in which the subarea is included. The second part comprises a row of characters that uniquely indicate which subarea in this organisation area that is being referred to.
A subarea that is included in an organisation area with the short name “org” can be given the short name “orghelpdesk”.
There are some name-related rules:
- Two different subareas in the same organisation area must not be given the same name.
- Two different subareas in the same organisation area must not be given the same short name.
Create new subarea
To add an area, the three fields at the top of the window are used.
- In the drop-down list, select the organisation area the subarea shall belong to.
- Enter the new area’s name under Subarea.
- Enter the new area’s short name under Short name. The part of the short name that highlights the organisation area is already filled in.
- Click on Add.
Delete subarea
To delete a subarea:
- In the list, select the short name of the area that is to be deleted.
- Press the Delete key or select Delete in the context menu (see picture above).
Normally you can remove a subarea, even if there are objects connected to it. The objects, for example users, are still there, but the connection to the removed subarea disappears. Exceptions are if removal should lead to forbidden references between two objects. Removal of a subarea is stopped, for example, if forbidden references are created between a schedule and the template days the schedule uses.
If you delete a subarea, all normal users lose the potential to view statistics for the area. However, the statistics themselves are not deleted. Users with the system manager access role can view the statistics.
Change subarea’s name
In the list, double-click on the name to be changed and enter the new name.