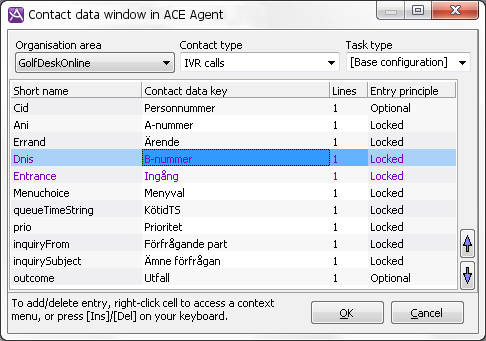
Under the ACE Admin Agent application | Contact data window in ACE Agent menu choice you configure the look of the Contact data support function.
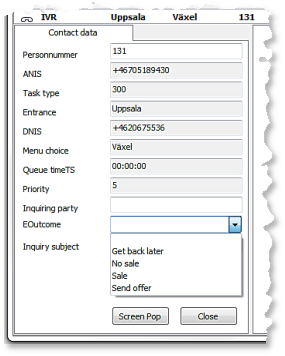
In the screenshot below you see ACE Agent with open Contact data support function.
Some common contact data are:
| Key (Shortname) | Standard name | Use |
|---|---|---|
| Entrance | Entrance | DNIS, the telephone number a call is made to, for calls. Email address to customer service for incoming emails. |
| Cid | Cid | Customer number or social security number. |
| Menu choice | Menu choice | The menu choice given in an IVR dialogue for incoming calls. |
| Outcome | Outcome | The result for a handled contact. The contact data key is used in connection with feed-back in ACE Agent. |
The standard name of a contact data key is configurable.
Specify what to present in the contact data window
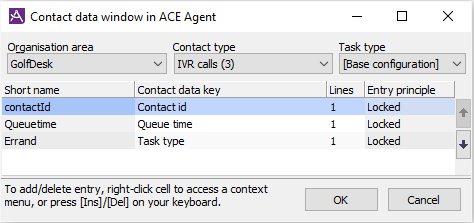
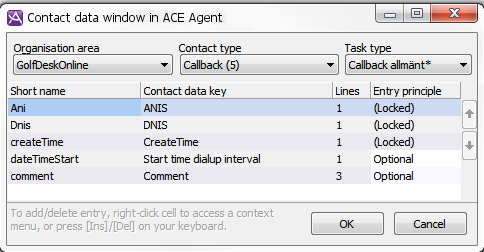
In the Contact data window in ACE Agent window in ACE Admin you set, per contact type for each organisation area:
Which contact data keys that shall be presented in ACE Agent. Under the Shortname heading the internal (database) name of the contact data key is shown. Under the Contact data key heading the name seen in ACE Agent is presented.
- How to present the contact data keys in ACE Agent. The relative order between the presented contact data keys is changed by using arrows, found to the right of the window. The number of lines the key value is allowed to occupy is entered under the Lines heading.
- Entry principle for the contact data keys presented, i.e. whether the field for the contact data key value should be editable or not, and whether an editable field should require a value or not. You can only edit some contact data. A contact data key can be mandatory, optional, or locked, no matter if a value set exists or not. The differences between the entry principles are seen below:
 The differences between the entry principles are seen here...
Recommended Optional Locked The key must be given a value. If the contact data window contains at least one required contact data key, the Contact data function area in ACE Agent will be opened when a new contact arrives, no matter whether the Show contact data automatically client setting is activated or not.
Mandatory fields are shown in ACE Agent with a red tinted background colour. This colour indicates that the field is in some way wrongly filled in (i.a. not filled in case this is required). The agent is also alerted that there are recommended or mandatory fields that are not filled in by the asterisk
 then seen by the support function name.
If your wrapup time is limited the support function will, however, be closed down when the contact and any wrapup belonging to it, is ended regardless of whether the field has been filled in or not.
The key may, but is not required to, be given a value or be changed. Optional fields are displayed in ACE Agent with white background colour. The key cannot be given a value or be changed. Locked fields are displayed in ACE Agent with grey background colour. - Exceptions from the entry principle – a restraint configured per task type. Exceptions from the entry principles can be made for one or more task types. The purpose is to tailor the rules for the different requirements different tasks entail.
You see that the task type already has an exception from the contact data key default configuration by the fact that the name of the task type is shown with an asterisk * in the drop-down menu under the Task type title.
- When handling incoming calls in ACE Agent, the A, B and C customer unique keys are used.
- When the task type for the current contact is ”Invoices”, outcome should always be registered for the A and B keys. They are then made recommended. The C key is not used for this task type and is therefore made locked.
- When the task type for the current contact is "Order"”, outcome may be registered for the A key, should the agent consider this necessary. It is therefore made optional. Outcome must always be registered for the B key, consequently made recommended. C is not used for this task type and is consequently made locked.
Add contact data key
This is how you add a contact data key:
- Select Organisation area.
- Then select from the drop-down menu the contact type for which you want to add a contact data key. The figure beside each contact type indicates how many contact data keys that are shown in the Contact data window in ACE Agent.
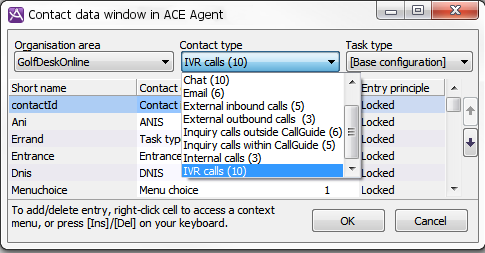
- Under the Task type heading you select [Base configuration].
A new contact data key can only be added for all task types, so-called Base configuration. Exceptions from how the contact data key is presented, may then, for some of the contact types, be made per task type. See section Change contact data key presentation.

- Press your right-hand mouse button to open the context menu and select the Add... menu option. You may also use the Insert key on your keyboard.
- In the Contact data key column, click on the empty row at the bottom. Select from the drop-down menu the key to be visible in the Contact data support function in ACE Agent. The short name (database name) of the contact data key is filled in automatically.
- Under the Lines heading you select the number of lines the value of the contact data key is allowed to occupy.
- Then select Entry principle. State whether the field for the contact data key value should be editable or not, and whether an editable field should be required or optional to fill in.
Until you have clicked on the OK button, new contact data keys are shown in green text. Changed contact data keys, added at an earlier occasion, are seen in blue text.
Change contact data key sequence
To change the sequence in which the contact data keys are presented in ACE Agent’s Contact data window, select the row to be moved and then click one of the arrows to the right in the window.
You can also use the Ctrl ↑ or Ctrl ↓ key combinations on your keyboard. Moved contact data keys are seen in purple text until you have clicked on the OK button.
Change contact data key presentation
To change the presentation of a contact data key in ACE Agent you first select the organisation area and the contact type for which you want to change the contact data key.
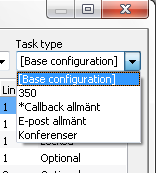
Under the Task type heading you select from the drop-down menu whether the contact data key should be configured for all task types, [Base configuration] or for a specific task type.
However, you cannot always select task type. The drop-down menu is greyed, should the task type not be meaningful or applicable for the selected task type, e.g. if the task type is incoming external call.
For a task type with entry principle already changed, i.e. different from the base configuration of the contact data key, an asterisk * is shown beside the name of the task type.
Changed contact data keys, either in the base configuration or for some task type, are seen in purple text until you have clicked on the OK button. This regardless of change of view, to look at another, unchanged, task type.
Change contact data key for base configuration
If you have selected [Base configuration] under Task type you can change
- how many rows a contact data key value is allowed to occupy,
- the entry principle for each key, i.e. whether the field for the contact data key value should be editable or not, and whether an editable field should be required or optional to fill in,
- the contact data key presentation sequence.
Change contact data key for task type
You can make exceptions from the base configuration for one or more task types, but just for the entry principle, i.e. you may specify for some contact data keys whether the contact data key value should be editable or not, and whether an editable field should be required or optional to fill in.
Under the Task type title you select (if the contact type allows this) the task type for which you want to make an exception from the base configuration.
For a task type with entry principle already changed, i.e. different from the base configuration of the contact data key, an asterisk * is shown beside the name of the task type.
The entry principle of the base configuration is seen in brackets. In the example picture (Recommended). The same entry principle, in this example Recommended, is also seen without brackets. This is what you select if you want the contact data key value to require input, regardless of whether the entry principle for the base configuration is changed to Locked or Optional.
Delete contact data key
Select the item to be removed, click in the Contact data key field, then press the right mouse button to open a quick-select menu and select Delete. You can also use the Delete key on your keyboard.
Undo contact data key delete
If you have removed an earlier saved contact data key and not yet closed the window, using the OK button, you can undo the removal. You do this by pressing your right mouse button to open a quick-select menu. Select Undo delete or press Ctrl Z on your keyboard.
However, if you remove a newly added contact data key, shown in green, you cannot undo this action.
Contact data keys for Enquiry calls
Besides the keys configured for Enquiry calls, the keys configured for the original contact’s contact type are also shown for an enquiry call in the ACE Agent Contact Data window. The values of these keys are, as far as possible, copied from the original contact to the enquiry call. Then normally you only have to configure, for enquiry calls, to view the contact data keys that are specially designed for enquiry calls.
| Key (shortname) | Standard name | Use |
|---|---|---|
| enquiryAddress | enquiryAddress | ANIS for IVR calls, senders of emails and numbers to call for callback calls are copied to this key. |
| enquirySubject | enquirySubject | Menu choices for IVR calls, subject for emails and menu choice for callback calls are copied to this key. |
| enquiry/From | enquiry/From | This key indicates who initiated the enquiry. |
| enquiry/To | enquiry/To | This key indicates who receives the enquiry. |
The contact data key’s standard names can be configured.