As administrator, you can create one or two campaign unique contact data windows that will be displayed automatically in ACE Agent when a campaign record is accepted by the agent. The windows are open while the campaign contact is in progress and cannot be closed manually. These windows can however be hidden in the same way as the general contact data window.
The look of the windows in ACE Agent is configured per campaign in ACE Admin, the Campaign contact data window.

This is where you specify
- whether one, two or no windows should be created. To make the contact data window considered as defined and to be able to be displayed in ACE Agent, at least one row with a contact data key should be defined in ACE Admin,
- a name for each window, e.g. Prospect and Address. Window 1 and window 2 are given names that are then seen at the top of each window in ACE Agent,
- the contact data to be displayed in each window,
- the relative order of the displayed contact data, or
- whether the agent should be able to change the value for a specific contact data key.
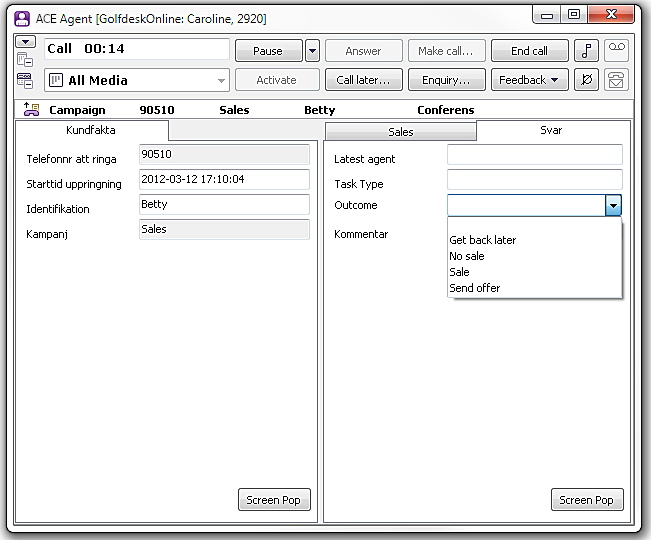
In the screen-shot above you see ACE Agent with two campaign unique contact data windows.
Create campaign unique window
To create a campaign unique contact data window, do the following:
- First enter a unique descriptive name in the Window name box
- Then click in the Contact data key column in the first empty row. Select from the drop-down menu the key you want to be visible in the campaign unique contact data window in ACE Agent. The short name (database name) of the contact data key is filled in automatically.
- State the number of lines the value of the contact data key is allowed to use.
- In the column with the Allow edit title, you select whether the value of the contact data key should be editable or not. An editable value of a contact data key is ticked
 . Some contact data keys, however, are hard coded so as not to allow edit. Fields that are not editable are locked and displayed with grey background in ACE Agent.
Remove contact data key
First select the row to be deleted. Then click in the Contact data key column and select, in the drop-down menu, the empty field at the top. The row will disappear when you click anywhere else in the window.
Changing sequence for contact data keys
To change the sequence, you select the row to be moved and then click on the relevant arrow to the right in the window.