All the statistical reports you can look at in ACE Report can be schedule to be generated in various formats and be distributed via email to one or more recipients, or be stored on a file server - without further manual handling. This scheduled activity for generating statistical reports is also called a report job, or just a job.
Scheduled Reports, where you see, create, modify, and remove report jobs, is opened in ACE Report's workspace in two different ways:
- Select Scheduled Reports under the Tools menu choice.
- Select a report in the Report picker and click on the Schedule button under Filter settings
The upper part of Scheduled Report displays information about the report jobs. The only thing you can change here is whether the job shall be activated or deactivated. Which function buttons you can use depends on which report that has been selected in the list.
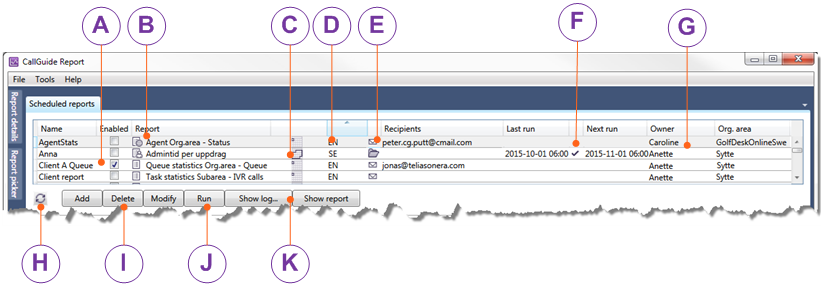
Name and Enabled
You can change if the job shall be activated or inactivated
Select the report job and add/remove the tick in the check-box.
You can change if the job shall be activated or inactivated
Select the report job and add/remove the tick in the check-box.
Report type and name
 Standard
 Global tailored
 Personal tailored followed by the report's name
Time unit for the report
 Current situation
 Day
Day Week
Week Month
Month
Language
shows whether the texts in the generated report are seen in
SE – Swedish, EN – English or FI – Finnish.
shows whether the texts in the generated report are seen in
SE – Swedish, EN – English or FI – Finnish.
Distribution
-
 if the report shall be stored as a file.
 -
 followed by recipient address(es) if the report is to be sent as email.
Last run, Status and Next run
Date and time when the job was last concluded and an icon showing the outcome of this run. Details are seen in the Show log view .
.
Date and time when the job was last concluded and an icon showing the outcome of this run. Details are seen in the Show log view
- Job is run right now
 Last run was OK
 Last run failed
.
Owner
User name and area affiliation for the user having created the report. When you move your mouse pointer over this field, you also see the user’s first name and surname.
User name and area affiliation for the user having created the report. When you move your mouse pointer over this field, you also see the user’s first name and surname.
Update
 status, e.g. to see if a job is started.
status, e.g. to see if a job is started.Add, Delete, Modify are described below.
Run
Start running the selected report job, disregarding any configured time schedule.
You use this e.g. when you want to distribute a report by email.
Start running the selected report job, disregarding any configured time schedule.
You use this e.g. when you want to distribute a report by email.
Show log opens a separate log window.
Show report presents the selected report in a separate tab in the workspace.
Show report presents the selected report in a separate tab in the workspace.