At the top of the User accounts window you choose the selection criteria for the users you want to view. In the drop-down men under the Organisation area header, you choose among the areas included in your access areas. Under Subarea you choose whether you want to view users serving a specific subarea that is not included in any subarea, or All.
Under the Access role header, you either choose a specific role, or the All option, if you have the access right to view all.
In the User accounts window you now see the list of users, built on your selection above. For each user you see various data in up to 17 columns. The number of columns and whether they contain any information or not, depends on how your ACE system is configured and which licences that are included.
Which details you can see in the User accounts window, and how they are modified, is described here; from left to right, from top to bottom:
Mandatory data for an ACE user
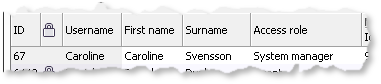
- ID
- An automatically assigned id number for the user.
User accounts that for some reason have been locked are seen with a padlock
 . This can take place
- automatically, at synchronization towards e.g. a company directory via AD Adapter,
- by administrator have selected Account locked, via the Security button,
- due to rules set via System parameters, such as after a number of login attempts or after a specific time when the old password has expired.
- Username
- A system unique name that cannot be changed.
If your organisation is using Single-Sign-On the username must always be the same as in e.g. the local network. If you are using ACE AD Adapter you can administrate user details in Microsoft Active Directory.
- First name
- Can be edited directly in the table.
- Surname
- Can be edited directly in the table.
- Access role
- Can be edited directly in the table, where you pick access role from a drop-down menu. To see what is included in a specific access role, you click on the Access roles button at the bottom right in the User accounts window.
Data for mobile login and personal greeting phrase
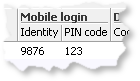
The following data is used for mobile login See Various telephony connectionsThe same data are used for handling personal greeting phrase in IVR Gateway as well. Mobile identity for personal greeting phrase via IVR.
- Identity
- The agent identifies himself at login via IVR uniquely using this code.
- PIN code
- At mobile login, the agent may have to enter a password via a specific PIN code - normally a sequence of figures. However, this box can be left empty.
Parameters for direct telephony

The following data is used for direct telephony, i.e. handling Direct Inward Dialling calls.
- Code
- If the customer is to call a telephone number shared by all agents, and if calls are then routed to a unique user using a code, this is where you enter this code; the figures the customer shall specify in IVR.
- Number
- If the customer is to call a so-called flexible extension per agent, this is where you enter the user’s telephone number. The number is written with area code number and local number You can enter the following characters: figures 0-9, spaces, hyphens, and parentheses.
- Tag
- Used to separate agents with similar names when a speech controlled Direct Inward Dialling call arrives. Specify e.g. location. The speech control function the can ask whether the wanted agent is Michael Anderson in Uppsala or Mikael Andersson in Oslo.
For basic information about personal or direct telephony see Direct Inward Dialing and alternative answering point If you use ACE Voice, also see Personal telephony.
Parameters for voice mail and alternative answering point
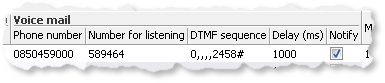
Some of the fields under the Voice mail collective header may be inactive because a value is missing in a related field. If you hold your mouse pointer over a field you see what is needed, e.g. You must enter a telephone number before you can specify a number for listening and Number for listening must be filled in before you can enter a DTMF code.
- Telephone number
- The telephone number calls can be routed to in case the agent is not ready. Can e.g. be a mobile telephone. The number is entered in the same format as under number for Direct Inward Dialling calls above.
For users of ACE Mobile Agent you also add the telephone number to the mobile telephone that will be used.
- Number for listening
- If your solution is equipped with voice mail, this is where you specify the number to be called to listen to messages.
- DTMF code
- Voice mail services require identification by a DTMF code. This is where you enter the DTMF code required to log in to the voice mail, e.g. 0,1234. then the agent can, by clicking on a button in ACE Agent, make a call and automatically be logged in to his voice mail.
- Delay (ms)
- Any delay in milliseconds that is required before the DTMF sequence is sent.
- Notify
- Specifies whether a notification shall be made when the call is routed to an alternative answering point. The user sees the notification in ACE Agent by the button to use for make a call to the alternative answering point changes colour. A system restriction for notification to be carried out is that the call to the alternative answering point is in progress for more than 10 seconds. If the call is shorter, this interpreted as no message has been supplied.
Parameter concerning chat handling
Parameters concerning routing of calls
- Primary queue
- This is where you select, from a drop-down menu, the (operator) queue calls shall be routed to in case the agent is not available.
Parameters for individually tailored wrap-up time
- Wrap up factor %
- A newly employed person that is not yet quite accustomed to support systems etc. needs more wrap-up time than the more experienced users. Here you can specify the percentage of the wrap-up time that the user shall have as his individual wrap-up time. The percentage is originally 100 % and can be configured from 0 % to 900 %.
Example:
Wrap-up time is 10 seconds for task type A and 60 seconds for task type B.
100 % wrap-up time is thus 10 seconds wrap-up time for contacts with task type A and 60 seconds for contacts with task type B.
The inexperienced beginner given 200 % in individual wrap-up gets a wrap-up time of 20 seconds for contacts with task type A and 120 seconds for contacts with task type B.
Parameters concerning connected UC systems

- Alias
- Editable directly in the table. This is where you enter the ACE user’s user identity in a presence or attendant message system, called UC system here. The column is visible if the Settings for UC system window is configured. In the screenshot you see the Marvin attendant message system, Settings for UC systems are described in UC system settings.
All people included in your telephony solution do not have to be configured here. If you are using ACE User Extension the operator can queue to, and change presence message and operator information for people that are not agents in ACE. These people are found via ACE Unifinder if they exist as users in a connected UC system or in address books.
The buttons in the middle of the User accounts window
| Add | Create new user. |
| Duplicate | Creates a new row with some data filled in from the selected original. |
| Delete | Delete the selected user. |
 Search Search |
Activate the search tool where you can specify various criteria for search in or filtration of the table content. |
 Export Export |
Copy data to a file. From the User accounts window an extra window is opened, where you can select, via radio buttons, what to export and in which format. |
 Import Import |
Import user accounts via the Import to ACE Admin function. |
Content in the bottom part in the User accounts window
- Access areas
- See and change the organisation areas and subareas the user has the access rights to supervise and configure.
For users with the System responsible role access to all areas is included automatically.
- Belongs to subarea
- See and change the subareas the user belongs to when he is working as an agent. The subareas belong to the Organisation area you have opted to see, and is part of the selected user’s affiliation areas.
Here you can find a subarea that is only used for synchronization of user accounts via ACE AD Adapter.
- Groups
- See and change the groups in which the user is included.
- Skills
- See and change the skills and the level per skill the user has.
- Email account
- This is where you enter the user’s email address. This is mandatory if emails aret o be processed in a separate email application.
If the emails are read, composed and sent via ACE Agent’s email window, you do not have to specify the address, but it may come in handy with other user information...
- Do not use integrated email client for this user
- If emails are to be processed in a separate email application you tick the check-box and make sure the email address is specified in the field above.
The buttons to the bottom right open new windows
| Security... | See whether an account is locked. Lock or unlock user accounts or change password. |
| Serves... | See which queues and waiting lists the selected agent serves |
| Access roles... | See the functions that are included in each respective access role. |
Look at user accounts without changing anything
If you will be allowing several colleagues to look at configurations for agents, without risking that something is changed, you can give the access function View user. In the access rights is included to see
- all columns in the User accounts window,
- security information via the Security button,
- which queues that are served via the Serves button.