To limit and distribute calls peaks by offering customers to set up phone appointments with the contact centre via IVR, as described in Basics about Callback appointment schedule, you use the Callback appointment schedule window, found in ACE Admin, under the Media | Outbound telephony | Callback Appointment schedule menu choice.
To adapt a callback appointment schedule to an organization you must know
- the complexity of the errands, in order to estimate how many minutes each appointment may last — this estimate is an important input for defining the length of the time slots the working day is divided into,
- the manning situation, to determine how many concurrent appointments can be handled per time slot,
- what is to be entered in the IVR by the calling person requesting an appointment. Is the caller allowed to change the first suggested appointment time and should the caller enter any kind of identification?
- the opening hours for the IVR menu choice leading to the desired callback appointment schedule,
- Best practice for handling callback appointment schedules.
Add a callback appointment schedule
To add a Callback appointment schedule, start with selecting the Organisation area and Sub area in the top drop down menues.
To enter a descriptive name to the schedule do one of the following:
- double click on the first available row,
- choose Add in the right click menu,
- press the keyboard's Insert,
- open the pull tab and click the + (Add) button.
The schedule will now reside in the selected Organisation area and belong to the selected Sub area. The sub area assignment can be modified in the Settings tab.
Continue by adding a default task type (preferably unique to the schedule), as explained in Best practice for handling callback appointment schedules.
The new schedule will default to an Active state, but you can change this at any time; see Stop a schedule temporarily.
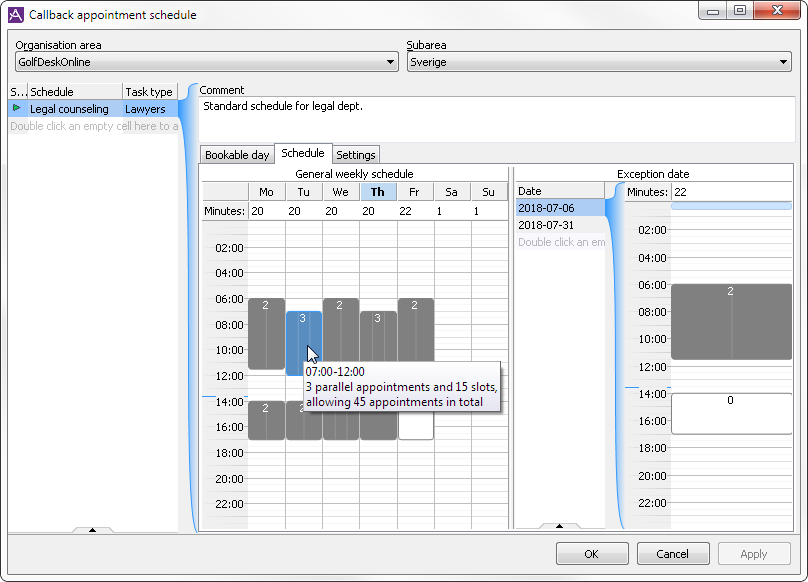
Once a schedule is created, switch to the Schedule tab to set up a weekly regular schedule, and optionally add exceptions for certain dates you already know will deviate from the regular schedule.
For each weekday of the schedule you can set Minutes per appointment — how many minutes the average appointment may last — i.e. the length of each time slot.
To set the time slots when callback appointment can be offered, select a time range for one or several days with your pointing device to open the Edit bookable time window. You can also select ranges with the arrow keys on the keyboard and then press Enter or F2 to open the Edit bookable time window.
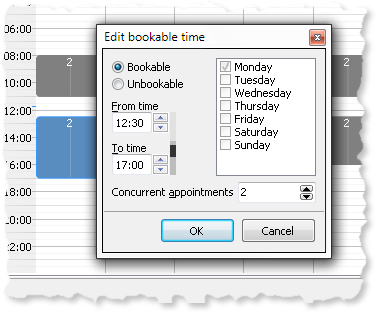
In the Edit bookable time window:
- First choose whether you want the selected time period to be Bookable or Unbookable.
- Then you select start and stop time in the From time and To time time fields.
- If the time period is Bookable, you can also set the number of Concurrent appointments allowed for the time period.
- Tick the
 weekdays to be included in the schedule and click OK.
The times and weekdays you pick in the Edit bookable time window apply — regardless of the time range earlier selected in the schedule area.
The schedule area is divided into 30 minute intervals. If you move your mouse pointer over a block in the schedule, you see the exact range for that block, the maximum concurrent appointments, and the total number of appointments allowed. If the time range of the block is not an even multiple of the Minutes per appointment value for that day, the number of trailing, i.e. unusable, minutes are also displayed in the hint.
If you set up a schedule with many short intervals you might need to adjust the amount of minutes per appointment accordingly.
- The Minutes per appointment is set to 14 minutes.
- The number of concurrent appointments is one.
- Bookable times are between 13:00 and 17:00, i.e. 240 minutes.
- During this interval 17 appointments can be made.The remaining two minutes is not enough for a bookable time.
Before you close and save your schedule with OK, you might want to change how the IVR interacts with the person requesting callback, or modify the sub area assignments.
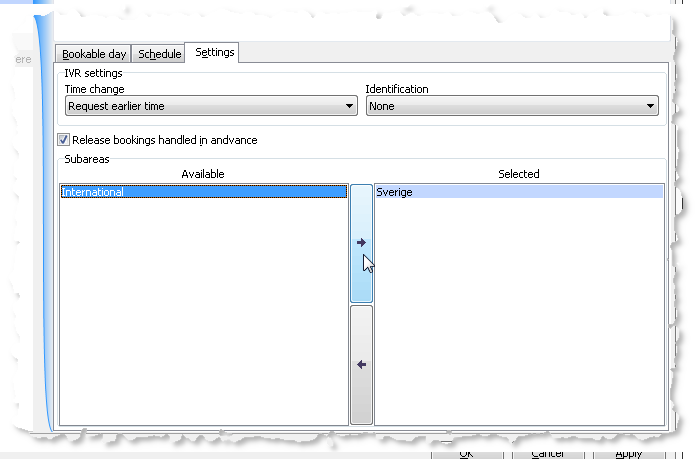
Settings
Options to let a caller change suggested time
- None
- The caller can only accept the suggested time, or hang up to discontinue the booking.
- Request earlier time
- The caller can ask for an earlier time, accept the first suggested time, or hang up.
- Request later time
- The caller can ask for a later time, accept the first suggested time, or hang up.
- Request earlier or later time
- The caller can choose between asking for suggestions of both earlier or later time, choose to accept the first suggested time, or hang up.
- Enter arbitrary time
- The caller can propose any time within the bookable interval. The IVR will then suggest the closest available time.
- Enter arbitrary time - with verbal feedback
- The same option as above, with the addition of having the IVR read out the bookable time interval to the caller.
Decide if and how the caller should be identified
- None
- The IVR dialogue will not ask for any identification.
- 10 digit social security number
- The caller is asked to enter a Swedish social security number, without century, YYMMDDNNNN.
- 12 digit social security number
- The caller is asked to enter a Swedish social security number, including century, YYYYMMDDNNNN.
- Arbitrary customer ID
- The IVR asks the caller for an ID number, for example a customer number, PIN code or booking number.
Release appointments for re-use
- Release bookings handled in advance
- Appointments called and handled before the booked time slot has passed is made bookable again by ticking this option.
Assign Sub areas
To assign an appointment schedule to one or more sub areas, simply select the desired sub areas in the Available box and either drag them to the Selected box, or click the right arrow button, or press the Delete key. Similarly, to remove assigned sub areas, select the ones to remove
in the Selected box and either drag them to the Available box or click the left arrow button, or press the Insert key.
Exception dates, where the schedule differs
For days with other working hours than the regular schedule, or days with e.g. less staff available, you can in advance create an Exception date. The configuration, made in the right hand side of the Callback appointment schedule window, is done in the same way as for the regular schedule described above. The only difference is that you start by choosing a date for the exception.
It is always possible to create exceptions for future days, and to change the weekly schedule at any time. However, changing the weekly schedule for the day booking is in progress for — if this day already has bookings — creates an automatic exception for this day in order to keep the schedule intact as it was prior to the change.
The Bookable day
The bookable time slots for the current bookable day are shown and managed in the Bookable day tab. This is where you can change the maximum allowed number of concurrent appointments per time slot that have not yet passed, for the current bookable day.
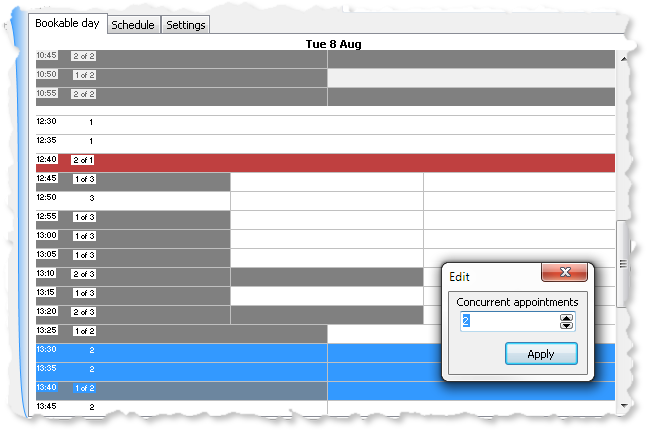
Each bookable time slot is listed with a start time and number of allowed concurrent appointments in numerical form. The slots are also divided graphically to illustrate the number of allowed appointments, as shown in the image above.
Any actual appointments already booked are shown both numerically (e.g. "1 of 3", meaning one booking out of three possible is already made for the time slot) and graphically as shaded blocks. Overbooked time slots are shaded red.
To change the number of concurrent appointments allowed for a range of bookable time slots, select the range of slots and change the number in the Edit box that appears (see the image above). Selecting a single slot will not automatically open the Edit box, but you can always open it manually by either
- right-clicking and select Edit,
- double-clicking the desired time slot,
- pressing Enter, or
- pressing F2.
The bookable time slots that — according to the clock in your computer — is in the past are shaded light gray, but in case the computer clock differs from the clock on the server, it is still possible to edit the number of allowed concurrent appointments for these time slots as well.
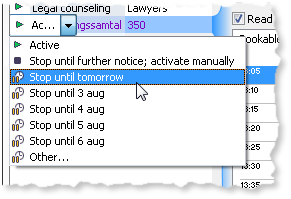
Stop a schedule temporarily
In case of unexpected changes you can stop a callback appointment schedule to prevent new bookings, and activate it again when e.g. the staff situation is sorted out.
Opening hours in IVR versus bookable time
There is the dependency between the callback appointment schedule and the opening hours set for the counselling menu choice in the IVR.
- The counselling menu choice in the IVR is open between 08.00 and 10.00 on weekdays and there are bookable time slots between 13.00 and 16.00 on weekdays.
- Customers calling the IVR between 08.00 and 10.00 can book an appointment among the still available time slots between 13.00 and 16.00.
- If the same IVR menu choice would be open between 08.00 and 15.00, the customer calling 14.00 would only be able to book an appointment among the still available time slots between 14.00 and 16.00.