
To add a queue or a waiting list, click on the Add... button in the Queues and waiting lists window, found under the Routing | Queues and waiting lists menu choice.
By the three windows opened one after the other, you can configure the new queue/waiting list, and see which existing agents that can potentially help in serving it.
The guided tour starts with the Add queue or waiting list window.
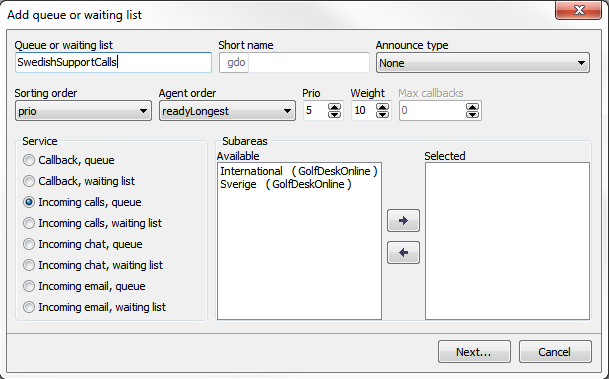
Facts are specified with text areas, radio buttons and drop-down lists.
When you are done with the Add queue/waiting list window, click on the Continue... button.
Next step is to fill in the Skills constraint window.
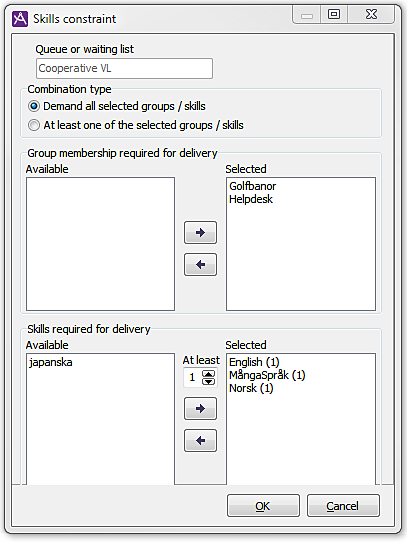
In this window you specify which groups an agent must belong to in order to be able to serve a queue, and which skills the agent is to possess in order serve it.
The lists in the Group membership required for delivery area show which groups it is currently necessary for the agent to be in (Selected), and which are not required (Available).
The lists in the Skills required for delivery area show which skills it is currently necessary for the agent to have (Selected), and which are not required (Available).
To move a group/skill between Available and Selected, select it and use the arrow that is pointing away from the list in which the group/skill occurs. When you are going to move a skill from Available to Selected in this way, you must also specify the minimum demands for skill level. This is done, before clicking on the right arrow button, by selecting the skill level in the box whose number can be increased and decreased.
This window also contains a couple of radio buttons that you use to select one of the alternatives:
The Previous... button leads back to the previous window.
The OK button leads to the final window in the guided tour – the Confirm skills constraint window.
The Confirm skills constraint window shows the agents satisfying the requirements for serving the queue/waiting list. To enter this list, an agent must also have the access function for the service the queue/waiting list belongs to.
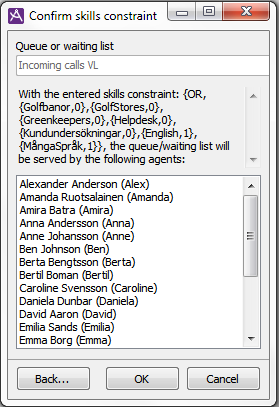
The Previous... button leads back to the previous window. The OK button ends the guided tour. The Cancel button can be used if you do not want to create the queue/waiting list you have specified.
To delete a queue or waiting list, select its name in the Queue/waiting list column and then press the Delete button.
You are not allowed to delete a queue if it is attached to a so-called collaborating queue. First you must disable the collaboration. See Collaborating queue or waiting list.
A short name for a deleted queue or waiting list can not be reused until the next day, mainly to allow the statistics to be correctly calculated for the current day.
The following information for an existing queue, or waiting list, can be edited directly in the table:
Skills constraints for a queue or a waiting list can be changed using the Skills constraint... button.
Subareas is changed by altering the number of subareas to which the queue/waiting list belongs via the Subareas... button.
All changes take effect when the Queues and Waiting lists window is closed with the OK button.
Service and Short name consist of fixed values selected in connection with the creation of a queue or a waiting list and they cannot be changed.
In the Queues and waiting lists window, select the name of the queue/list whose subarea affiliation is to be changed, and then click on the Subareas... button in the window. The Belongs to subarea window is shown.
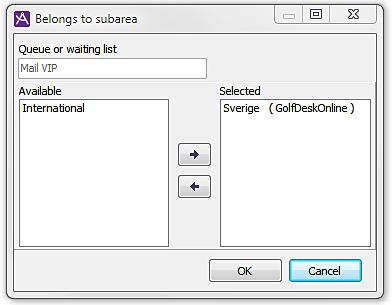
There are two lists here. The Selected list shows which subareas the queue/waiting list currently belongs to. The Available list shows which ones the queue/waiting list currently does not belong to. Move a subarea from one list to the other by selecting the subarea and clicking the arrow button pointing away from the list in which the subarea is found. This can be repeated any number of times before you click on OK to leave the window.
The Skills constraint... button leads to a Skills constraint window that is almost identical to the corresponding window in the guided tour for the creation of a new queue/waiting list. The window’s function is the same as this other window (The Previous... button is missing, though).
In the Queues and waiting lists window, select the name of the queue/list whose skills constraint is to be changed, and then click on the Skills constraint... button.